In a makerspace, an uneven first layer is more than a “tuning” problem — it’s a reliability problem. One member gets a perfect start, the next member gets a first layer that’s too squished on the left and barely touching on the right, and suddenly you’re burning workshop time on re-levels, glue sticks, and guesswork.
The fix is usually straightforward once you treat it like a system: mechanics → measurement → compensation → fine tuning. This guide gives you a fast diagnosis flow you can teach to others (especially if you’re running Klipper on a CoreXY like the SV08 / SV08 Max).
Fast checklist (2–3 minutes): which problem bucket are you in?
Run this quick triage before you touch slicer settings.
-
Is the bed actually clean?
-
If the first layer looks patchy in random spots (not a consistent left/right pattern), you might be printing on finger oils or residue.
-
Does the “too close / too far” pattern stay in the same place?
-
Same left side always too close, right side always too far = geometry (gantry/bed) or mesh/probe.
-
Randomly different each print = probe repeatability, temperature (cold mesh vs hot print), loose hardware, or filament/extrusion inconsistency.
-
Is Klipper actually applying your mesh?
-
If you have a mesh saved but your start macro never loads it, you’re effectively printing “no mesh.” (You’ll see this a lot in shared printers where macros get edited over time.)
-
Is it happening on every build surface?
-
If you swap sheets/plates and the pattern changes, it may be a sheet issue.
-
If the pattern stays identical, it’s the machine/mesh.
Key Takeaway: If the unevenness is consistent (same regions always too high/low), don’t start with temperature or glue. Start with geometry and mesh.
What an “uneven first layer” really means
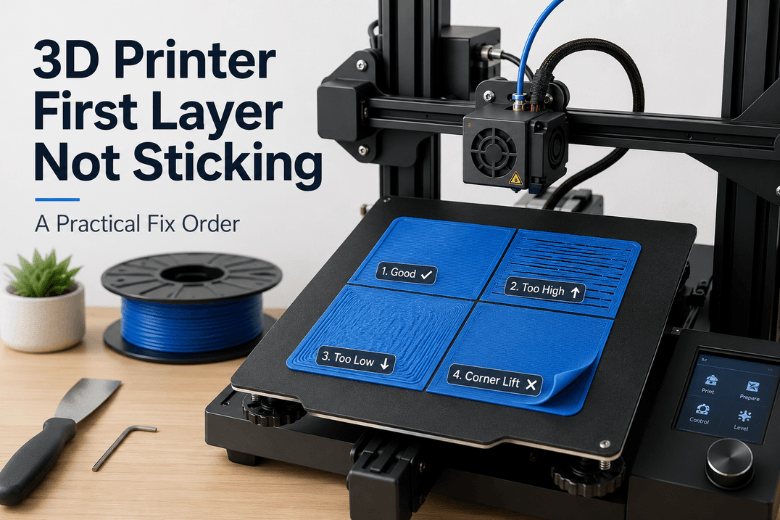
When people say “uneven first layer,” they usually mean one of these:
-
Height variation across the bed: the nozzle-to-bed gap changes as the toolhead moves (classic “left squished, right barely touching”).
-
Extrusion variation that looks like height variation: under-extrusion, partial clogs, or wet filament makes lines look thin and inconsistent — even if the height is fine.
-
First-layer speed/flow too aggressive: the nozzle drags or smears in one area because the plastic isn’t bonding fast enough.
The reason this matters: Klipper’s mesh can compensate for a bed that isn’t perfectly flat, but Klipper also makes it easy to accidentally stack complexity (probe offsets, mesh profiles, fade settings, macros) and end up “calibrating the wrong thing.”
For the official baseline principles, Klipper’s own documentation is clear that bed leveling and mesh have limits and can’t substitute for solid mechanics and accurate probing (see Klipper’s bed leveling guide and Klipper bed mesh documentation).
The fix order that actually works (Klipper + CoreXY)
If you want consistent results across multiple users, run these steps in order. Each step includes a “done when…” check.
Step 1: Clean the plate like you mean it
Even a perfect mesh won’t save you from skin oils.
-
Quick between-prints: IPA wipe.
-
If adhesion or consistency suddenly dropped: warm water + dish soap, rinse, fully dry.
-
After cleaning: avoid touching the print area.
Done when: water sheets evenly on the surface and you can’t see “fingerprint zones.”
If you want a makerspace-friendly baseline on adhesion fundamentals (without turning this into a glue debate), link members to Sovol’s guide on first-layer bed adhesion fixes.
Step 2: Gantry tramming and mechanical checks (before you trust the mesh)
CoreXY printers are great at speed and stability — but they still need basic mechanical truth:
-
Ensure the frame is solid and fasteners are snug.
-
Check belt tension isn’t wildly uneven.
-
If you have dual rails or long gantries, confirm nothing is binding.
A practical deep-dive on first-layer inconsistency (including mechanical causes mesh can’t fix) is Ellis’ guide: first-layer inconsistency troubleshooting.
Done when: nothing is loose, motion is smooth, and the “same spot fails every time” pattern doesn’t trace back to a mechanical wobble.
Step 3: Verify your probe is repeatable (and your Z offset is plausible)
An auto-level system is only as good as its probe consistency.
-
If your probe mounting is loose or the probe triggers inconsistently, you’ll chase your tail.
-
Don’t jump straight to “lower Z” — if one side is already too close, lowering Z makes that side worse.
Done when: consecutive probe/mesh runs produce similar results and your first layer isn’t wildly different print-to-print.
Step 4: Rebuild your bed mesh at printing temperature
Mesh on a cold bed, print on a hot bed, and you can end up compensating for the wrong shape.
-
Heat the bed to your normal first-layer temperature.
-
Let it soak for a few minutes if your space is cold (common UK garage/workshop scenario).
-
Then home and mesh.
Done when: the mesh you rely on is created under the same thermal conditions you print under.
If you want a more complete “calibration order of operations” to standardise across multiple printers, Sovol’s 3D printer calibration guide pairs well with this article.
Step 5: Confirm the mesh is actually being applied
This sounds obvious — until you inherit a printer profile that was modified by five different people.
-
Confirm your start routine loads the correct mesh profile (or re-generates it intentionally).
-
If you’re debugging, simplify first.
Pro Tip: If you’re not sure whether compensation is active, temporarily print a large first-layer test and watch for subtle Z motion during the first layer. (Don’t treat this as a perfect test — just a fast “is anything happening?” sanity check.)
Done when: you can say with confidence “this print used this mesh,” not “I think it did.”
Step 6: How to set Z offset using a first-layer test
Once geometry + probe + mesh are sane, Z offset becomes a fine adjustment (not a band-aid).
-
Print a first-layer pattern that spans the bed.
-
Adjust in small steps.
-
Your goal is consistent line contact with no gaps and no aggressive ridges.
Done when: the first layer looks consistent across the bed (not just in the centre) and the nozzle isn’t dragging.
Step 7: Only then touch slicer knobs (speed, temps, flow)
If the first layer is still uneven after the steps above, these settings can help — but they’re rarely the root cause of a consistent left/right pattern.
-
Slow first layer down.
-
Add a little first-layer temperature if you’re borderline.
-
If lines look thin or “ropey,” check for partial clogs or filament issues.
Done when: the first layer is stable enough that you’re not relying on brims/glue as the primary fix.
Klipper gotchas that make first layers look uneven
These show up a lot in real-world Klipper setups.
Mesh fade settings can hide the real problem
Fade can be useful, but it can also confuse diagnosis. If you’re troubleshooting, it’s often better to disable fade until you trust the leveling behaviour.
A commonly referenced Klipper issue discussion recommends removing fade options until you’re confident bed leveling is working correctly (see Klipper guidance on disabling fade while diagnosing).
More mesh points won’t fix bad mechanics
If the gantry is out of tram or the probe is inconsistent, a denser mesh just produces a more detailed map of a problem you still haven’t fixed.
Use the mesh to correct small surface variation — not to compensate for a machine that isn’t square.
Makerspace standardisation: make this repeatable for different users
If your goal is uptime (not tinkering), standardise a simple SOP:
-
Rule 1: Clean before you calibrate.
-
Rule 2: Heat soak before you mesh.
-
Rule 3: One approved start macro. Lock it down and document it.
-
Rule 4: One first-layer test model everyone uses for diagnosis.
-
Rule 5: Log changes. If someone changes a macro or probe mount, it goes in the log.
For ongoing reliability checks, Sovol’s 3D printer maintenance checklist is a decent “don’t forget the basics” reference to share with members.
FAQ
Why is one side of my first layer perfect and the other side terrible?
That’s usually geometry or compensation: gantry not trammed, bed tilt/warp, probe inconsistency, or the mesh not being applied. Follow the fix order: mechanics/probe/mesh first, then Z offset.
My bed mesh looks fine in the UI — why is the first layer still uneven?
Because a saved mesh isn’t the same as an applied mesh, and mesh can’t compensate for everything. Confirm the mesh is loaded in your start routine, and remember that Klipper’s docs note mesh can’t compensate for skewed axes or inaccurate probing.
Should I just lower Z until it sticks everywhere?
Not if one area is already too close. Over-squishing can create new problems (dragging, ridges, poor surface finish) and it hides the root cause.
Does this change for a CoreXY like the SV08 / SV08 Max?
The fundamentals are the same, but CoreXY setups make it even more important to keep mechanics tight (frame rigidity, belts, smooth motion) because any alignment issue can show up as a consistent pattern across the bed. For CoreXY background, you can point newer members to Sovol’s explainer on how CoreXY technology affects print consistency.
Key takeaways
-
An uneven first layer is usually geometry or compensation, not a random slicer setting.
-
Fix order for reliability: clean → mechanics → probe → mesh (hot) → confirm mesh loads → fine-tune Z.
-
Don’t use a lower Z offset as a universal “make it stick” hack — it can make one side worse.
-
In a makerspace, standardising SOPs beats “hero calibration” every time.
Next steps
If you’re evaluating printers for a makerspace, you want more than peak speed claims — you want a setup that’s repeatable, teachable, and supported.
Sovol’s UK site is built around that makerspace reality (open-source-friendly ecosystem, local UK support/shipping, and practical guides). If you’re comparing options, start by browsing Sovol and use the checklist in this article as part of your evaluation process.
Share:
How to Fix First Layer Adhesion Problems in 3D Printing
How to Get a Perfect First Layer on an FDM 3D Printer