In a makerspace, the first layer isn’t just “the start of a print.” It’s the point where mentor time disappears, queues back up, and confidence drops—especially when ten people are using the same machine with ten different habits.
This guide is a makerspace SOP: a repeatable routine you can teach, post next to the printer, and enforce. It’s written for generic FDM/FFF printers (no specific model assumed).
What you’re standardising (so first layers stop being a guessing game)
Before you touch slicer settings, pick a standard.
Standardise these three things first:
-
One build surface per printer (and a cleaning method that actually works).
-
One baseline slicer profile per filament type (PLA, PETG) that members don’t edit.
-
One verification print (a 1-layer square) that everyone runs after changes.
A reliable print room is a stack of profiles + materials + training + maintenance, not just “a printer on a table.” (Sovol has a longer write-up on this makerspace workflow approach—linked in Next steps.)
Key Takeaway: In a shared space, you don’t need “perfect settings.” You need a perfect routine.
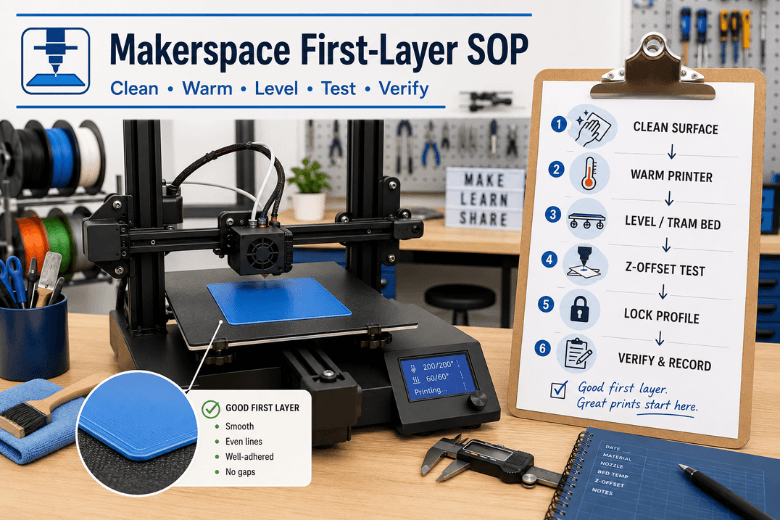
The makerspace perfect first layer SOP (input → action → expected output)
Run this SOP any time you:
-
change filament type
-
swap a nozzle
-
remove/replace a flex plate
-
move the printer
-
see first-layer failures more than once in a session
Step 1 — Reset the variables (5 minutes)
Input: Printer is idle, bed is cool, last print is removed.
Action:
-
Remove scraps of filament, dust, and anything stuck to the plate.
-
If you’re using PEI (smooth or textured), wash it occasionally with warm water and dish soap, rinse, and dry fully. Then do a quick wipe before prints.
-
Don’t touch the print area with bare fingers.
A bed can look clean and still behave like it isn’t; treat it like a fingerprint magnet and clean it properly before chasing slicer micro-tweaks. (Sovol’s checklist is linked in Next steps.)
Expected output: A visibly clean surface with no oily patches, dust, or old adhesive residue.
Done when… you can run a dry fingertip along a corner (not the print zone) and it doesn’t feel greasy.
Step 2 — Warm the machine to printing temperature
Input: You know what material you’re about to print (PLA vs PETG).
Action:
-
Preheat bed + nozzle to the planned print temperatures.
-
Give the bed a few minutes to stabilise at temperature.
Expected output: Bed and nozzle are at target temps before you level, mesh, or adjust Z.
Done when… temperatures are stable (not still climbing).
Step 3 — Tram/level the bed (mechanical first)
Input: Hot printer, bed at temp.
Action:
-
Home the printer.
-
Use your printer’s manual leveling routine (or move the nozzle to the usual leveling points).
-
Use the “paper drag” method (or a thin feeler gauge if you have one) at each corner.
-
Make small changes and do at least two passes—adjusting one corner affects the others.
Expected output: Similar drag at each corner and the centre feels “close enough” to start.
Done when… the second pass needs only tiny tweaks.
Step 4 — Set Z-offset using a one-layer test (this is where perfection actually happens)
Input: Bed is trammed, printer is hot, baseline profile loaded.
Action:
-
Print a one-layer calibration square (20×20 mm is fine).
-
While it prints, adjust Z-offset in tiny increments.
-
As a rule of thumb, adjust in the 0.02–0.05 mm range per change, and wait a few seconds to see the effect.
-
Preheat, run a one-layer test, then live-adjust Z in small steps until lines are smooth and continuous.
Expected output: Adjacent lines touch with no gaps, and the surface looks uniform.
Done when… the layer looks consistent across the square (not just in one corner).
Step 5 — Lock the first-layer slicer baseline (don’t let everyone invent their own)
Input: Z-offset is correct and repeatable.
Action: Create “locked” baseline profiles for PLA and PETG (and name them clearly). Members can change only a small set of approved fields (more on that below).
General first-layer guidance: slow the first layer and consider increasing initial layer height/width to improve contact and tolerance for minor bed variation.
Expected output: A baseline profile that works on most models without per-user tinkering.
Done when… two different users can print the same first-layer test and get the same result.
Step 6 — Verify and record (the part most makerspaces skip)
Input: First-layer test looks good.
Action:
-
Record: date, material, profile name, and any change made (e.g., “Z-offset +0.03 mm”).
-
Keep the baseline test file on the printer’s SD card/USB so it’s always available.
Expected output: A simple log that prevents endless repeat troubleshooting.
Done when… the next mentor can see what changed without guessing.
Baseline first-layer settings (safe starting points for shared profiles)
These are not magic numbers; they’re safe, teachable starting ranges. The point is that everyone starts from the same baseline and logs changes.
PLA baseline (shared profile)
-
First-layer speed: 20–30 mm/s (or ~30–50% of normal speed)
-
First-layer height: ~0.20–0.25 mm (depending on nozzle and normal layer height)
-
First-layer line width: 110–120% is a solid starting point
-
Cooling: fan off for the first layer, then ramp up
PETG baseline (shared profile)
-
First-layer speed: 15–25 mm/s (slower if adhesion is inconsistent)
-
First-layer height: ~0.20–0.28 mm (slightly taller first layer can help)
-
First-layer line width: 110–120% as a starting point
-
Cooling: fan off for the first layer; keep fan lower than PLA after that
If you want one external baseline to cite for initial-layer tuning levers (speed/height/width and iterative adjustment), Simplify3D’s overview is a solid reference (linked in Next steps).
What members are allowed to change (and what they aren’t)
To keep uptime high, define your “allowed knobs.” Everything else is mentor-only.
Member-allowed changes (pick 2–4 max):
-
filament profile (PLA vs PETG)
-
nozzle temperature within a small range (e.g., ±5°C)
-
bed temperature within a small range (e.g., ±5°C)
-
first-layer speed (slow down one notch, not five different settings)
Mentor-only changes:
-
Z-offset / probe offsets
-
flow/extrusion multiplier
-
first-layer height/width
-
mesh/ABL procedures
-
acceleration/jerk/input shaping
Pro Tip: If a user “fixed” adhesion by cranking flow and first-layer width, they didn’t fix adhesion—they made it harder to diagnose. In a shared space, that’s a long-term cost.
Diagnose first-layer problems fast (symptom → likely cause → fix)
Use this table during the one-layer test.
|
What you see on layer 1 |
Most likely cause |
Fix (change one thing) |
|---|---|---|
|
Lines are round with visible gaps between them |
Nozzle too high (Z-offset too positive) |
Lower Z-offset slightly, re-test |
|
Nozzle drags, ridges form, surface looks scraped |
Nozzle too low (Z-offset too negative) |
Raise Z-offset slightly, re-test |
|
Random patches won’t stick even when squish looks OK |
Dirty/oily bed |
Wash plate (soap + water), dry, re-test |
|
Corners lift after a “good start” |
Drafts, cooling too aggressive, bed temp low |
Reduce draft exposure, fan off on layer 1, bump bed temp +5°C |
|
First layer looks mushy / elephant’s foot |
Too hot, or too much squish |
Reduce bed temp by 5°C or raise Z-offset a touch |
|
Pitted/rough, inconsistent extrusion; may hear faint popping |
Wet filament |
Dry filament; improve storage; re-test |
The maintenance cadence that protects first-layer reliability
Makerspaces lose reliability slowly—one slightly worn nozzle, one loose belt, one greasy plate at a time.
A simple cadence (adapt as needed):
-
Before each session: bed check + quick clean, confirm correct profile
-
After every few prints: nozzle wipe/inspection
-
Weekly: deeper plate clean; check for plate damage
-
Monthly: belts/screws check, fans/vents cleaning, lubrication as needed
For a practical checklist format, see the maintenance checklist linked in Next steps.
⚠️ Warning: If you change two variables at once, you’ll get a working print today and a broken system tomorrow. Teach “one change at a time.”
FAQ
Do we need adhesives (glue, hairspray, etc.) in a makerspace?
Sometimes, but treat them as a last resort. In a shared environment, adhesives can mask the real issue (dirty surface or wrong Z-offset) and create inconsistency between users. If you do allow them, standardise which adhesive, how much, and when it’s used.
Should we level the bed cold or hot?
If you can, do it warm—especially if you see inconsistency between “I levelled it” and “it prints.” Heat changes geometry slightly, and first layers happen hot.
Why does the first layer look great, then the print still warps later?
Because first-layer adhesion is only step one. Drafts, cooling, and material shrinkage can still lift corners after the first few layers. Start by checking drafts and cooling behaviour.
How do we handle different bed surfaces across the fleet?
Don’t—if you can avoid it. Standardise surfaces per printer. If you must mix, create separate locked profiles and label printers clearly.
Key takeaways
-
A perfect first layer is a repeatable pipeline, not a vibe: clean → warm → tram → Z-offset test → lock profile → verify.
-
Standardise surfaces, profiles, and allowed changes to protect uptime.
-
Diagnose by line shape: gaps = too high; ridges/scrape = too low.
-
Use a one-layer test as your universal “truth” check.
-
Maintenance on a calendar beats heroic mentor interventions.
Next steps (low-pressure)
If you’re building out a more reliable print-room workflow, these related guides can help you standardise beyond first layers:
-
Makerspace workflow framing: Personal Manufacturing: a maker workflow that scales
-
First-layer triage checklist: Fix 3D printer bed adhesion
-
Maintenance cadence: The Ultimate Checklist for 3D Printer Maintenance
-
External baseline reference: Simplify3D’s “Perfecting the First Layer”
Share:
Uneven First Layer: Why It Happens (and How to Fix It)
How to Stop Corners from Lifting on 3D Prints