If you’ve ever thought, “My slicer profile is solid—why does this print still look terrible?”, you’re not imagining it. A lot of print defects aren’t caused by the fancy settings you tweaked last time. They come from the real world: filament that’s picked up moisture, a nozzle that’s slowly clogging, cooling that’s pointed the wrong way, a belt that’s a touch loose, or a printer that’s being pushed faster than the hot end can melt.
For makerspaces and community leaders, this is more than a personal frustration. Bad prints mean downtime, wasted workshop hours, and new members losing confidence.
Key takeaways
-
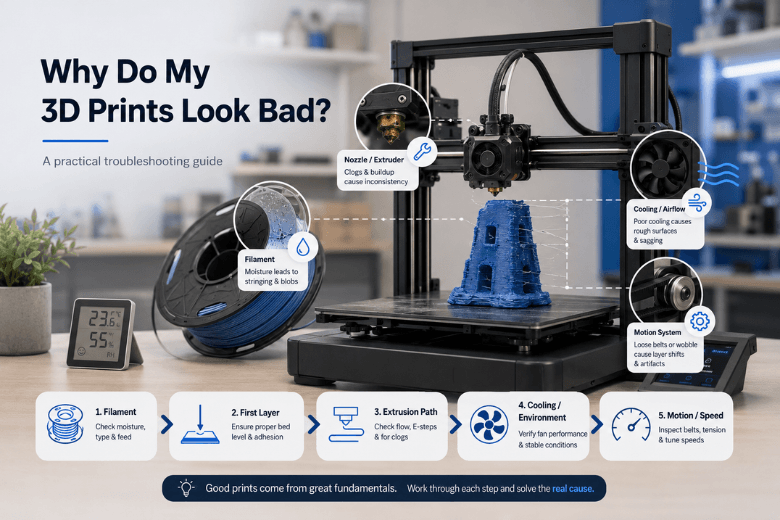
Most “bad prints with good settings” come from filament condition, extrusion consistency, cooling, and mechanics—not slicer magic.
-
Use a fixed diagnostic order so you don’t chase symptoms: filament → first layer → extrusion path → cooling/environment → motion/speed.
-
Change one variable at a time, verify with a small test print, then lock the result into a baseline profile.
Quick diagnosis table: symptom → likely cause → fast check
|
What you see |
Most common root causes |
Fast check (2–5 minutes) |
|---|---|---|
|
Stringing / wispy hairs |
Too hot, wet filament, retraction imbalance, weak cooling |
Dry-test filament (fresh sealed spool if possible); drop nozzle temp 5–10°C; run a small travel/retraction test |
|
Blobs / zits / random bumps |
Moisture, inconsistent extrusion, seam behaviour |
Listen for popping; watch extrusion at steady speed; inspect nozzle for buildup |
|
Rough or “sandpaper” walls |
Moisture, partial clog, over-temperature |
Inspect for bubbles/popping; cold pull / nozzle clean; reduce temp slightly |
|
Corners lifting / warping |
First layer inconsistency, drafts, cooling too aggressive early |
First-layer square test; check Z-offset consistency; block drafts; reduce early fan |
|
Random gaps / thin lines |
Partial clog, extruder slip, friction in filament path, printing too fast |
Mark filament and confirm consistent feed; check drive gear dust; slow down 20% |
|
Weak layers / splitting |
Too cold, too much cooling, printing too fast for good fusion |
Increase temp slightly; reduce fan; slow outer walls |
|
Ghosting/ringing |
Vibration, loose belts/pulleys, too much acceleration |
Print a calibration cube; reduce accel/speed; check belt tension |
For a symptom-first library, tools like the Simplify3D print quality troubleshooting index are useful. But if your settings are already “known good,” the bigger win is a reliable order of checks.
Why my 3D prints look bad: the diagnostic order that stops you chasing your tail
When multiple things are slightly off, defects overlap. A small partial clog can look like “bad retraction,” and wet filament can look like “wrong temperature.” So the trick is to test the fastest, most common variables first.
Here’s the order I recommend for consistent results across mixed users and materials:
-
Filament condition (especially moisture)
-
First layer and bed reality (Z-offset, cleanliness, repeatability)
-
Extrusion path health (nozzle, gears, friction, heat creep)
-
Cooling + environment (fan direction, drafts, enclosure behaviour)
-
Motion + speed limits (belts, resonance, throughput)
This aligns with the “calibrate first, diagnose systematically, change one variable at a time” discipline you’ll see in comprehensive guides like Obico’s troubleshooting guide.
1) Filament: wet filament print quality issues that mimic bad settings
If you only check one thing before a workshop session, check the filament.
Why it matters
Many common defects (stringing, rough walls, weak layers) show up when filament has absorbed moisture. Water flashes to steam in the hot end, disrupting flow and leaving tiny voids and bubbles.
Quick checks
-
Listen and look: Popping/crackling during extrusion is a classic sign.
-
Do a controlled extrusion: Heat to a normal printing temperature and extrude 100–200 mm. If the flow looks “foamy” or inconsistent, suspect filament condition.
-
Swap in a known-dry spool: This is the fastest way to isolate the variable.
Fixes that actually stick in a makerspace
-
Store spools sealed with desiccant.
-
Keep a “known good” spool for verification prints.
-
If you need a drying option, a filament dryer can be useful—Sovol’s guide to the SH03 filament dryer is a good starting point for understanding how drying fits into reliable workflows.
Pro Tip: If you’re troubleshooting stringing, do the filament check before you touch retraction. Wet filament can make you “tune” retraction into a worse place.
2) First layer: if it’s inconsistent, everything above it will look wrong
Why it matters
A first layer that’s slightly off can create warping, elephant’s foot, messy undersides, and even later failures that look like slicer issues. In shared spaces, the bigger problem is repeatability: the same file prints differently on different days.
Quick checks
-
Print a first-layer square (one layer, slow) and watch it.
-
Look for consistent line width and a uniform “squish.”
-
If it varies across the bed, you’re not done with bed setup.
Fixes
-
Clean the build surface (finger oils are enough to ruin adhesion).
-
Confirm Z-offset with a repeatable method.
-
Slow the first layer and widen first-layer line width slightly (when your workflow allows).
If you want a practical, step-by-step fix order, Sovol’s guide on bed adhesion fixes is worth linking in your internal documentation.
⚠️ Warning: Don’t “solve” adhesion by smashing the nozzle into the bed. You’ll trade one problem for clogs, rough first layers, and damaged surfaces.
3) Extrusion path: inconsistent extrusion 3D printer problems that look like slicer issues
Why it matters
A printer can look fine at the start, then gradually drift into under-extrusion, roughness, or random gaps. That’s often a restriction building up in the nozzle, debris from abrasive filaments, or inconsistent grip at the drive gear.
The Bambu Lab wiki’s breakdown of common print-quality problems highlights how often clogs and melting limits sit behind symptoms that people misdiagnose as slicer issues (see common print quality problems and fixes).
Quick checks
-
Inspect the nozzle tip: Buildup changes how plastic lays down.
-
Check the drive gear: If you see ground filament dust, you may have slip.
-
Watch for inconsistent extrusion during a slow wall print: If the line thickness changes with no setting change, suspect hardware.
Fixes
-
Clean or replace the nozzle (consumables are normal).
-
Check the filament path for friction (tight bends, snagging spools).
-
If you’re printing fast, confirm the hot end can keep up—otherwise you’ll compensate with temperature and create new problems.
4) Cooling and environment: airflow is a “hidden setting” you didn’t slice
Why it matters
Cooling is supposed to solidify plastic at the right time. But if your fan duct is misaligned, your room has a draft, or your enclosure is trapping too much heat, your print behaves like you changed half your slicer profile.
Quick checks
-
Verify the part cooling fan actually spins up when commanded.
-
Watch overhangs: if they curl or sag, you likely need better cooling or less temperature.
-
If parts warp unpredictably, check for drafts (doors, windows, extractor fans).
Practical tuning guidance
-
PLA often likes strong cooling, but too much cooling early can hurt adhesion.
-
PETG can look worse with excessive cooling (stringing and weaker bonding can increase).
-
Enclosures help with warp-prone materials, but can make PLA behave badly if the chamber gets too warm.
5) Motion and speed: high-speed exposes every weak link
Why it matters
Speed isn’t just “finish sooner.” It increases the demand on:
-
melt throughput (can the hot end melt enough plastic consistently?)
-
extruder grip and responsiveness
-
frame rigidity and resonance
When you push speed and acceleration, small mechanical issues become visible as ringing, shifted layers, or inconsistent extrusion.
Quick checks
-
Print a small calibration cube at your normal speed.
-
Print the same cube at 80% speed and lower acceleration.
-
If the slow cube looks dramatically better, you’ve found your boundary.
Fixes
-
Tighten belts and check pulleys for set-screw slip.
-
Reduce acceleration before you reduce speed (often the bigger quality lever).
-
Keep outer walls slower than infill if you need both finish and throughput.
Stop chasing “perfect settings”: standardise a calibration workflow
Once you’ve fixed the root cause, lock it into a routine. This is where 3D print quality troubleshooting stops being an emergency response and becomes a repeatable process.
A simple cadence for shared printers:
-
Weekly (or every spool change): first-layer square + extrusion sanity check
-
Monthly: nozzle inspection, belt tension check, fan cleaning
-
After any major change: re-check temperature, flow, and pressure/linear advance (if you use it)
Sovol’s calibration workflow guide is a solid 3D printer calibration workflow template for building a repeatable “baseline profile” process.
Next steps (low-drama, high impact)
If you want this to be easy for new members to follow, turn the diagnostic order into a laminated one-pager next to the printer:
-
Check filament condition → 2) Verify first layer → 3) Inspect nozzle/extruder → 4) Verify cooling/airflow → 5) Reduce acceleration/speed
And if you’re building a simple internal resource pack, start with:
-
Sovol’s calibration workflow for better print quality
-
A bed adhesion checklist
-
A maintenance checklist
For maintenance routines that reduce “mystery failures,” Sovol’s 3D printer maintenance checklist is a practical reference.
Share:
Why your 3D print is failing: common causes and fixes
How to Reduce Failed Prints on FDM 3D Printers