If you’re mentoring a makerspace, running workshops, or just trying to keep a shared printer reliable, repeated failures aren’t “bad luck”. They’re usually the same small set of root causes showing up in different ways.
By the end of this guide, you’ll have a repeatable 3D printing troubleshooting workflow you can teach to others — and a set of fixes that stop you chasing random slicer settings.
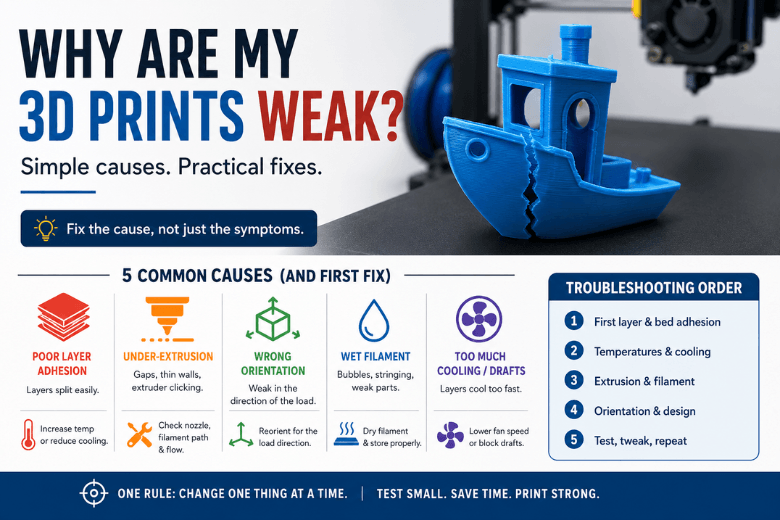
Key takeaways
-
Start with the first layer (cleanliness, bed level, Z-offset). It’s the foundation, and it causes many downstream failures.
-
Treat extrusion like a “fuel system”: if material isn’t flowing consistently, no slicer profile can save the print.
-
Fix hardware issues before tuning settings: layer shifting is usually mechanical (belts/pulleys/binding).
-
Change one thing at a time, then re-test with a small calibration print.
-
In the UK, filament storage matters more than people expect — moisture can look like stringing, rough surfaces, and weak parts.
Quick symptom → likely cause → first fix (when your 3D print is failing)
Use this table as triage. Then follow the diagnostic order in the next section.
|
What you see |
Most likely root cause |
First fix to try |
|---|---|---|
|
Print won’t start / lines won’t stick |
Bed dirty, nozzle too high, bed not level |
Clean plate, re-level/mesh, tune Z-offset |
|
Corners lifting / part detaches later |
Shrinkage + poor adhesion + drafts |
Brim, adjust bed temp/cooling, block drafts |
|
Hairy strings between parts |
Retraction/temperature, damp filament |
Dry filament, tune retraction, lower temp slightly |
|
Gaps, thin walls, “missing” sections |
Partial clog, feed resistance, too cold/fast |
Check nozzle, spool path, then temp/speed |
|
Whole layers shifted sideways |
Belts/pulleys loose, axis binding, too aggressive accel |
Inspect belts/pulleys, reduce accel/speed |
|
Clicks/chewing at extruder, no filament |
Clog or heat creep |
Clear clog, check heatbreak cooling, reduce heat soak |
The diagnostic order that saves time (especially with shared printers)
When a printer is failing repeatedly, don’t start with “let’s try a new profile”. Start with the highest-yield checks first.
-
First layer and bed setup (cleanliness → bed level/mesh → Z-offset)
-
Temperatures and cooling (especially the first few layers)
-
Filament + extrusion path (spool drag, tangles, moisture, partial clogs)
-
Retraction and travel (stringing/oozing)
-
Motion system (belts, pulleys, binding) for layer shifts and crashes
This “index of failure modes” approach mirrors how large troubleshooting libraries organise problems — for example, Simplify3D breaks issues into categories like adhesion, under-extrusion, stringing, clogs, and layer shifting in its Print Quality Troubleshooting Guide.
Pro Tip: Standardise a small “baseline test pack” (first-layer square, temperature tower, retraction test). When a print fails, run the smallest test that targets the suspected cause — not a 10-hour model.
1) First layer not sticking (and why it breaks everything else)
If your 3D print is failing early, or it looks fine and then turns into spaghetti, start here.
The usual causes
-
Bed surface is oily, dusty, or contaminated (hand oils are enough).
-
The nozzle is simply too high (or occasionally too low and dragging).
-
The bed isn’t trammed/levelled (or your mesh is out of date).
Prusa’s guide to common failures puts first-layer calibration at the centre of reliable printing, including cleaning the surface and fine-tuning the nozzle height via live adjustment in the first layers (Prusa: How to fix the most common 3D printing errors).
A practical fix order
-
Clean the build surface using the method appropriate for your plate material.
-
Level/tram (or run bed mesh) at printing temperature.
-
Tune Z-offset with a first-layer test print, in tiny increments.
-
Slow down the first layer and consider a brim for parts with small footprints.
If you want a deeper, printable checklist for your members, Sovol has a practical first-layer workflow in 3D printer first layer not sticking: a practical fix order.
⚠️ Warning: Don’t “fix” adhesion by crushing the nozzle into the bed. You can mask the symptom briefly, but you’ll introduce flow problems, rough first layers, and potentially damage the surface.
2) Warping and corner lift (the cooling-and-adhesion problem)
Warping is usually shrinkage winning against adhesion.
The Bambu Lab wiki describes warping/falling-off as a mix of shrinkage during printing and insufficient adhesion — and calls out drafts, cooling, and bed temperature as typical contributors (Bambu Lab: Common print quality problems).
Fixes that work in real shops
-
Improve bed contact: re-check the first layer; use a brim for sharp corners.
-
Reduce drafts: even a room door opening mid-print can matter on tall parts.
-
Adjust early cooling: too much fan too early can pull corners up.
-
Use appropriate bed temperature for the material (and give the bed time to stabilise).
If you’re printing larger parts, you may also want a deeper warping playbook: How to fix warping in 3D printing.
3) Stringing and oozing (often moisture + retraction)
Stringing is one of the easiest problems to “half-fix” and one of the easiest to misdiagnose.
The Bambu Lab wiki lists damp filament, long travels, and temperature as common drivers of stringing and oozing (Bambu Lab: Common print quality problems).
Fix order (don’t skip step 1)
-
Dry the filament (or at least test a known-dry spool). In UK conditions, a spool that’s been out for days can behave very differently from a sealed one.
-
Lower nozzle temperature slightly (small steps) if the material is very “runny”.
-
Tune retraction (distance and speed) using a simple stringing tower.
-
Reduce unnecessary travel across open areas (slicer features like avoiding crossing perimeters can help).
For a broader calibration workflow (beyond just stringing), you can link members to How to improve 3D print quality with a better calibration workflow.
4) Under-extrusion (treat it like a fuel-delivery problem)
Under-extrusion is where people waste the most time tweaking slicer profiles while a mechanical issue quietly persists.
According to the Bambu Lab wiki, common causes include spool drag/tangles, PTFE tube friction or damage, extruder gear problems, and nozzle blockage — and only after that do you look at temperature, speed, and flow ratio (Bambu Lab: Common print quality problems).
A quick diagnosis you can teach
-
Listen: clicking at the extruder often signals resistance.
-
Watch the spool: is it snagging, rubbing, or “overwinding”?
-
Inspect the filament path: sharp bends and worn tubes create drag.
-
Check the nozzle: partial clogs are common after dirty filament or long prints.
Fixes in order
-
Eliminate spool drag and tangles.
-
Clean extruder gears and check tension.
-
Clear a partial clog (cold pull / cleaning filament / nozzle clean).
-
Only then adjust temperature/speed and run a flow calibration.
5) Layer shifting (it’s usually not your slicer)
If your print suddenly shifts sideways, treat it as a motion-system problem first.
Prusa’s troubleshooting advice for layer shifts focuses on belt tension, pulleys, and obstructions — including checking that pulleys are secured and belts are appropriately tight (Prusa: How to fix the most common 3D printing errors).
What to check
-
Belt tension (too loose can skip; too tight can bind).
-
Pulleys: grub screws tight, pulleys aligned, idlers rotating freely.
-
Axis binding: debris, cable snag, bent rods/rails, overtight wheels.
-
Crashes: the nozzle hitting a curled edge or support can cause a step-loss.
Fixes
-
Fix the mechanical issue first.
-
Then reduce acceleration/speed if needed, especially on tall, high-inertia parts.
6) Clogs and “it prints fine… until it doesn’t”
Many repeated failures are “mid-print” failures: extrusion slowly degrades, then stops.
The Bambu Lab wiki’s clog section highlights causes like residue buildup, temperature mismatches, and heat-soak/softening issues — and recommends cleaning or replacing the nozzle when cleaning fails (Bambu Lab: Common print quality problems).
What to do
-
If extrusion becomes inconsistent: pause and inspect the nozzle tip and filament path.
-
Purge at an appropriate temperature for the material.
-
If you suspect heat creep: ensure the hotend cooling fan is working and avoid unnecessary heat soak.
A makerspace-friendly “baseline profile” (so you stop reinventing the wheel)
If you support a community, the goal isn’t a perfect profile — it’s a profile that survives mixed users.
Here’s a simple baseline that prevents a lot of chaos:
-
Maintain one approved profile per material (PLA, PETG, ABS/ASA if you run them).
-
Lock down the first layer: consistent cleaning routine + first-layer speed + brim defaults.
-
Keep a short maintenance cadence. Sovol’s 3D printer maintenance checklist is a solid starting point for weekly/monthly routines.
Key Takeaway: If you can’t get a clean first layer on a small calibration square, don’t start a long print. Fix the baseline first.
Next steps
If you’re standardising printers for a UK makerspace, look for machines (and vendors) that make the boring things easy: consistent first layers, accessible maintenance, and local support when you need parts quickly.
If you’re exploring options, you can browse Sovol as one open-source-friendly brand in that shortlist — just apply the same criteria-led approach you’d use for any other printer.
FAQ
Why does my 3D print fail halfway through?
Usually it’s either adhesion slowly failing (warping/corners lifting), or extrusion becoming inconsistent (partial clog, spool drag, heat creep). Re-run the diagnostic order: first layer → temps/cooling → extrusion path → motion.
Why do my prints fail more in winter in the UK?
Indoor humidity and temperature swings can change filament behaviour (moisture) and cooling/draft conditions around the printer. It’s also common to print in colder rooms with more drafts — which makes warping and adhesion problems more likely.
Is wet filament really that big a deal?
Yes — it can show up as stringing, rough surfaces, bubbles, and weak parts. If you’re diagnosing issues and you haven’t ruled out moisture, you’re often troubleshooting blind.
Should I change lots of settings at once to fix a failed print?
No. Change one thing, re-test with a small calibration print, and keep a simple log. It’s slower per attempt, but faster overall because you actually learn what fixed the problem.
Share:
Why Are My 3D Prints Weak and Breaking Easily?
Why my 3D prints look bad even with the right settings