If you run a makerspace (or you’re the person everyone asks when a print fails), the fastest way to cut downtime is to demystify the pipeline. Most “mystery failures” aren’t mysterious at all — they’re mismatches between what the file describes, what the slicer assumes, and what the machine can physically do.
Think of FDM printing like this: your slicer turns a 3D shape into a stack of 2D routes, and the printer just follows those routes while melting plastic.
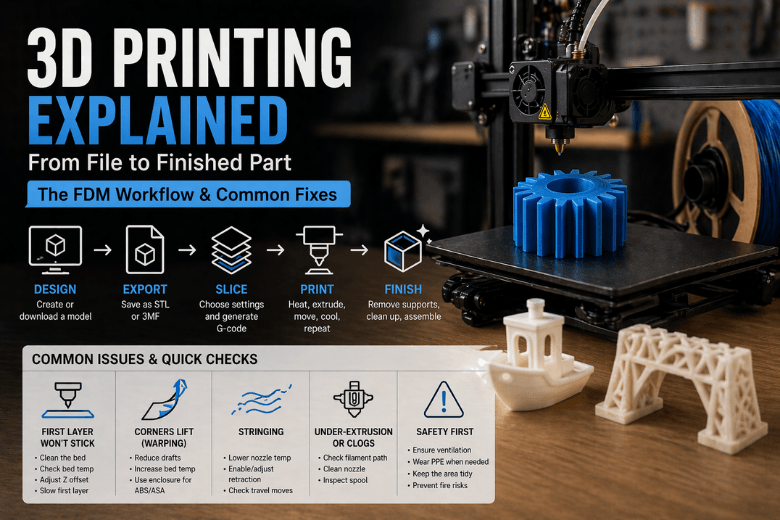
How 3D printing works in one loop (FFF/FDM)
According to 3D Systems’ overview of FDM as a material extrusion process, the machine’s job is simple: push filament, melt it, and lay it down precisely — one layer at a time.
That loop looks like:
-
Design a 3D model (or download one).
-
Export it (usually STL or 3MF).
-
Slice it: choose settings and generate G-code.
-
Print it: heat, extrude, move, cool, repeat.
-
Finish it: remove supports, clean up surfaces, assemble.
Key Takeaway: When you’re troubleshooting, always ask: “Is this a design problem, a slicing assumption, or a machine/setup issue?”
Step 1: Design — model with printing in mind
CAD is where you decide whether the part is printable without heroics. A few maker-tested design habits keep prints teachable:
-
Avoid paper-thin walls. They print inconsistently and snap in a busy workshop.
-
Give flat faces a small chamfer on the bottom edge. It reduces elephant’s foot and makes parts easier to remove.
-
Plan orientation early. If the part’s strength matters, align layers so the load isn’t trying to split them apart.
If you’re standardising for a community, it’s worth having a “default” orientation you teach first — then explain why you’d rotate for strength, supports, or surface finish.
Step 2: Export — STL vs 3MF (and why it matters)
Export is where scale and geometry errors sneak in.
-
STL is common, but it only stores a surface mesh.
-
3MF can also carry units and other metadata, which helps when files get passed around a community.
If you see gaps, missing faces, or slicer warnings, fix the model/mesh before you print.
Step 3: Slicing — turning a shape into G-code
Your slicer is where the real decisions happen. It’s not just “make it printable” — it’s “make it printable on this machine, with this material, for this purpose.”
The output is G-code: a line-by-line instruction list that tells the printer where to move, when to heat, and how much filament to push.
The settings that drive 80% of outcomes in slicing software:
-
Layer height: smaller layers look smoother but take longer.
-
Infill: not just “strength”; it’s strength where you need it.
-
Perimeters/walls: often more important than infill for part rigidity.
-
Supports: necessary for steep overhangs, but they cost time and surface quality.
Pro Tip: In a makerspace, teach one “baseline profile” first. Then let members change one variable at a time (e.g., only layer height) so failures stay explainable.
Step 4: Printing — what the machine physically does
Once you start the print, the machine is executing a repeatable physical routine:
-
The hotend heats up.
-
The extruder pushes filament into the melt zone.
-
Molten plastic flows through the nozzle and is deposited along the toolpath.
-
The part cooling fan(s) help the plastic set so the next layer can bond cleanly.
In practical terms, you’re managing three things:
-
Flow (can the hotend melt fast enough for your speed?)
-
Bonding (are layers fusing, or just stacking?)
-
Cooling (are overhangs and bridges solidifying without warping?)
This is where it helps to use examples your members can point at. If your workshop runs Sovol machines, you can show how different printers and materials fit the workflow by browsing Sovol 3D printers and explaining what changes (build volume, motion system, cooling design) and what doesn’t (the G-code loop is the same).
Step 5: The failures you’ll actually see (and the fastest checks)
Most community downtime comes from a short list of failure modes:
First layer won’t stick (first layer adhesion)
First layer adhesion = the first layer bonds reliably to the build surface. Without that, nothing else matters.
Fast checks:
-
Is the bed clean and at the right temperature for the material?
-
Is your first layer being squished slightly (not floating, not scraping)?
Corners lift (warping)
Fast checks:
-
Is the room drafty or cold?
-
Are you using a material that shrinks more (ABS/ASA) without an enclosure?
Stringing between parts
Fast checks:
-
Is the nozzle temperature higher than it needs to be?
-
Is retraction enabled and reasonable for your setup?
Random under-extrusion or clogs
Fast checks:
-
Is the filament path smooth (no tight bends, no snagging spool)?
-
Is the nozzle partially blocked?
⚠️ Warning: In shared spaces, treat ventilation and fire awareness as part of the “printing workflow,” not an afterthought. The University of Edinburgh’s 3D printer health & safety guidance is a solid baseline for controls and supervision.
A quick note on resin and powder printing
You’ll hear “3D printing” used to describe very different machines:
-
SLA/MSLA resin printers cure liquid resin with UV light. They can produce excellent detail, but the workflow includes washing and post-curing, and resin handling demands better PPE discipline.
-
SLS powder printers fuse powder with a laser. The powder supports the part (so fewer support structures), and parts can be very functional — but systems and materials are typically far more expensive.
If you need a concise comparison for explaining trade-offs to your community, Formlabs’ guide on FDM vs SLA vs SLS is a useful reference.
Next steps (especially if you’re standardising a workshop)
If you want fewer failures and more throughput, standardise two things:
-
A baseline slicer profile for your most common material.
-
A baseline filament choice that behaves predictably for beginners.
For filament-based printing, that second piece matters more than people think. If your space is running Sovol machines, pointing members to a consistent material set — like the options on Sovol filaments — makes it easier to teach temperature, cooling, and first-layer behaviour without everyone bringing unknown spools.
Key takeaways
-
FDM is a repeatable loop: CAD → export → slice → G-code → heat/extrude/move/cool → finish.
-
Most “mystery” failures map to one of three buckets: design, slicer assumptions, or machine setup.
-
For makerspaces, baseline profiles + consistent filament choices are the quickest path to higher uptime.
-
Other processes (resin/powder) change the workflow and safety requirements — they’re not just “another printer.”
Share:
How PLA Filament Works: From Digital Design to 3D Printed Model
Why 3D Printing Is More Than Just a Hobby