If you run printers in a makerspace, PLA is usually the material that keeps the queue moving. But when prints start failing, the advice you hear is often either too vague (“tune your settings”) or too narrow (“it’s wet filament”) to be useful.
This guide gives you a working mental model you can teach: how PLA filament works from file to toolpath to hotend, what PLA is doing as it heats and cools, and why the same handful of failure modes keep showing up in shared workshops.
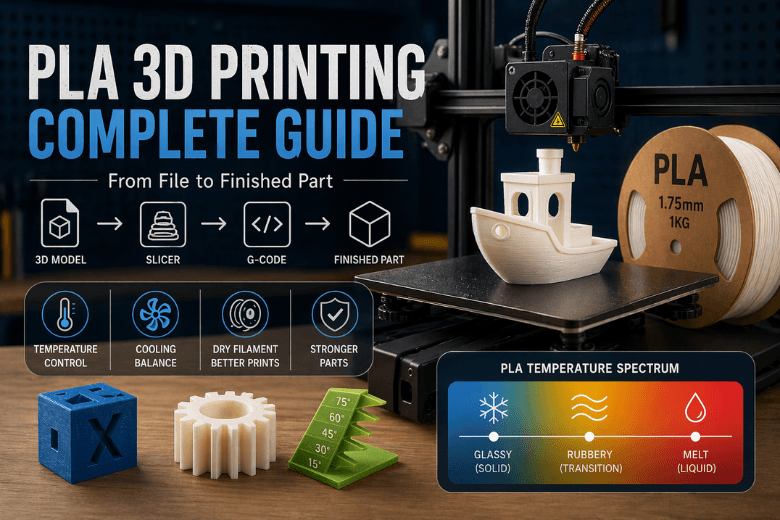
Key Takeaway: Most PLA problems aren’t random. They’re predictable outcomes of (1) how the slicer planned the toolpath and (2) where your filament sits on the PLA temperature spectrum: glassy → rubbery → molten.
How PLA filament works in practice: CAD file → toolpath → melted plastic
Think of FFF/FDM printing as a translation job with three languages:
-
Design language: a 3D model (your idea)
-
Manufacturing language: a toolpath (where the nozzle will go)
-
Machine language: G-code (commands your printer can execute)
Once you see those layers, it becomes easier to diagnose where something went wrong.
Step 1: Your CAD model becomes a mesh file (STL or 3MF)
Most slicers don’t print your original CAD features. They print a mesh.
-
STL is the classic: it describes shape using triangles.
-
3MF can store extra metadata (useful when you want a file that carries settings and part organisation more reliably).
For makerspaces: if you want fewer “it sliced weirdly” surprises, 3MF is often easier to pass around because it can preserve more context.
Step 2: Slicing turns the mesh into a plan (this is where most “mystery” issues start)
When you click Slice, the software decides:
-
which lines will be walls/perimeters (strength + surface quality)
-
which lines will be infill (internal support, not a magic strength dial)
-
how to do overhangs/bridges and whether to add support
-
where the printer will do travel moves (and how retraction will behave)
The output is a toolpath preview. If you’re mentoring beginners, that preview is your best teaching aid: it shows what the printer thinks it will do.
Step 3: STL to G-code: what the slicer actually exports
Most people say “export an STL and print it”, but the printer can’t read STL.
What the slicer really outputs is G-code: a plain-text script of commands like “move here”, “extrude this much”, “set this temperature”, “turn the fan on”. Your printer’s firmware reads that script and turns it into:
-
heater targets (nozzle/bed temperature)
-
motor steps (X/Y/Z motion)
-
extruder steps (how much filament to push)
-
fan control (cooling)
In other words: your printer isn’t “printing a model”. It’s following a script.
What the slicer is really deciding (and how that shows up in the part)
If you’re trying to boost print success and durability in a shared shop, focus on the settings that change the structure of the toolpath, not just the cosmetics.
Walls beat infill for strength more often than people expect
In most real parts, extra perimeters/walls add more usable strength than pushing infill from, say, 15% to 30%.
Why? Walls create continuous load paths around the outside of the part. Infill is interrupted by pattern and direction changes.
If you want a quick refresher on how slicers treat shells, the Prusa knowledge base article on Layers and perimeters is a solid reference.
Layer height is a quality dial and a bonding dial
A smaller layer height often improves detail and surface finish, but it also changes how each strand is squished into the layer below.
The practical teaching point: don’t change layer height in isolation. If you change layer height, you’ve changed how much plastic must melt per second at a given speed.
“Speed” is limited by melt capacity (flow), not marketing numbers
Two printers can both claim high speeds, but the real limiter is whether the hotend can melt enough PLA consistently.
When you exceed flow capacity, the symptoms look like:
-
under-extrusion on corners
-
weak layer bonding
-
rough surfaces that don’t match the preview
That’s why consistent workshop profiles matter more than chasing a new top speed every week.
PLA filament printing temperature: what matters more than the exact number
People often ask for a single magic number for PLA. In reality, you’re managing three related zones:
-
The cold zone (filament must stay solid enough to push)
-
The transition zone (filament is rubbery and grabby)
-
The melt zone (filament is liquid enough to flow smoothly)
The goal is not “print at 205°C”. The goal is “keep the transition zone short and stable, and keep flow consistent for the toolpath you’ve asked for”.
PLA’s glass transition temperature (Tg) is commonly summarised around 60°C. All3DP gives a practical overview in its guide to PLA, PETG & ABS glass transition temperatures.
Heat creep explained (why PLA clogs “for no reason”)
Here’s the part most basic material guides skip: PLA doesn’t go from solid to liquid instantly.
In the classic RepRap explanation of hotend design, the Hot End Design Theory page describes the transition phase between Tg and melting temperature (Tm) as the most critical part of extrusion: the filament can become rubbery, expand, grip the hotend walls, and resist extrusion/retraction—making jams more likely.
PLA is especially sensitive because its Tg is relatively low, so it doesn’t take much stray heat creeping up the heatbreak to push the filament into that rubbery, grabby state.
What to check in a makerspace before you blame the spool:
-
Heatsink fan actually running (and not blocked by dust)
-
Heatbreak installed correctly and not smeared with excess thermal paste
-
Retractions not set aggressively high for the hotend (too much “yo-yo”)
-
Nozzle temperature not higher than it needs to be for that PLA and that speed
⚠️ Warning: If you treat every PLA jam as “bad filament”, you’ll miss a common root cause: the hotend’s transition zone getting too warm for too long.
What PLA is doing while it cools: first layer, warping, and layer adhesion
PLA is popular in community settings because it typically warps less than many other materials. But “less” isn’t “never”, especially with drafts, dirty beds, or aggressive cooling.
The first layer is not about perfection; it’s about controllability
For workshops, first layer success is a process problem:
-
Clean bed (consistent routine)
-
Correct Z offset (consistent checks)
-
Slower first layer
-
Cooling reduced or off for the first layer
If you want a makerspace-oriented walkthrough of the overall pipeline, Sovol’s internal post on How Does FDM 3D Printing Work? PLA to Finished Print is a useful companion.
Cooling is a trade-off: detail vs bonding
Cooling makes overhangs and bridges cleaner. But if you over-cool small parts, you can hurt layer bonding because each new layer lands on plastic that has already dropped below that rubbery window.
A simple teaching rule for mentors:
-
Too much cooling → crisp overhangs, but parts can snap along layers
-
Too little cooling → stronger bonding, but droopy overhangs and messy corners
PLA stringing: what it is and what it isn’t
PLA stringing is not “the printer being messy”. It’s molten plastic oozing when the nozzle moves between features.
The pressure model (the one that helps people tune faster)
When you extrude, you build pressure in the hotend. When you stop extruding and travel, the pressure doesn’t instantly drop to zero—so a small amount of PLA can ooze.
Retraction is your pressure-relief valve.
The four knobs that interact
If you want fewer strings, tune in this order:
-
Dry filament (because steam bubbles can mimic bad retraction)
-
Temperature (too hot → runny PLA)
-
Retraction distance and speed
-
Travel behaviour (long travels make stringing more visible)
For many shops, the mistake is tuning retraction forever when the spool is simply damp.
How to store PLA filament in a shared makerspace (so the profile stays stable)
In a makerspace, PLA management is operations.
Quick “is this PLA wet?” checks
-
Popping/hissing at the nozzle
-
Rough, bubbly surfaces
-
Sudden increase in stringing on a previously stable profile
-
Brittle filament snapping when unspooling
Storage that works in community settings
Aim for simple and enforceable:
-
Sealed boxes/bags + desiccant
-
Label spools with open date
-
“Known-good spool” kept aside for troubleshooting
If you want a broader, workshop-oriented discussion of when PLA is the right choice and when it isn’t, Sovol’s guide to PLA pros, cons, and best use cases is a good internal reference.
Drying PLA without turning it into a reliability problem
PLA can be dried at relatively low temperatures (many people use mid‑40°C ranges). The exact number depends on the spool and dryer, but the principle is: warm enough to drive off moisture, not so warm you soften the spool or deform the filament.
If you want an example of a purpose-built drying workflow for a shared environment, Sovol’s article on filament dryer workflow for shared spools explains the practical value of controlled drying and storage.
And if you’re standardising spools across multiple printers, a simple reference point is that most community setups run 1.75mm PLA on 1kg spools—for example, Sovol sells Sovol PLA as two 1kg rolls (2kg total), which fits the “swap spools fast, keep profiles consistent” workflow.
Makerspace safety notes (short, practical, not alarmist)
PLA is often considered one of the more approachable filaments, but “approachable” still means you should run a basic safety playbook.
NIOSH’s Approaches to safe 3D printing guide (2024) focuses on practical controls for makerspaces, including ventilation and enclosures.
A reasonable baseline for shared shops:
-
Keep printers in a ventilated area (don’t print in a tiny sealed cupboard)
-
Treat hotends and beds as burn hazards; enforce a “stop before touch” rule
-
Keep flammables away; don’t store solvent bottles beside printers
-
Have a simple SOP for failures (who stops the print, who cleans the nozzle, who logs the change)
FAQ
Is PLA “strong”?
It can be strong enough for many indoor functional parts, but it’s also relatively stiff and can fail suddenly under impact or heat. For parts that will flex, take knocks, or sit in warm environments, you’ll usually want a different material.
Why does PLA warp less than ABS, but still sometimes lifts at the corners?
Warping is driven by shrinkage as plastic cools. PLA’s behaviour tends to be easier to manage, but drafts, poor bed prep, and too much early cooling can still pull corners up.
Why do prints snap along layers?
That’s often layer bonding. Before you raise infill, check nozzle temperature, cooling, and whether you’re trying to print faster than your hotend can melt consistently.
Why does the printer clog more on PLA than PETG?
A common cause is heat creep interacting with PLA’s low glass transition temperature. If the filament softens too high up the hotend, it can expand and grip, making retractions and extrusion unreliable.
Next steps for community leaders
If you want fewer failed prints per week, prioritise the “boring” wins:
-
standardise one known-good PLA profile per printer model
-
keep one known-good spool dry for troubleshooting
-
teach the pressure model (extrusion + retraction) instead of superstition
For further reading within Sovol’s UK site, point members to the “PLA to finished print” article and the “PLA pros/cons” guide linked above, or browse common filaments for FFF printers when you’re standardising what spools you keep on the shelf.
Share:
How to Choose 3D Printing Filament for Your Project (UK Guide)
How 3D Printing Works: From Design to Finished Product