Corner lift (often grouped under “3D print warping”) happens when the part cools and shrinks in a way that pulls the edges upward faster than the bed can hold them down. Most advice says “increase bed temp” or “add a brim.” Those can help — but if you run a makerspace or community fleet, what you really need is a decision framework you can teach and repeat.
This post focuses on PLA and PETG on heated-bed printers, and covers both open-frame and enclosed setups.
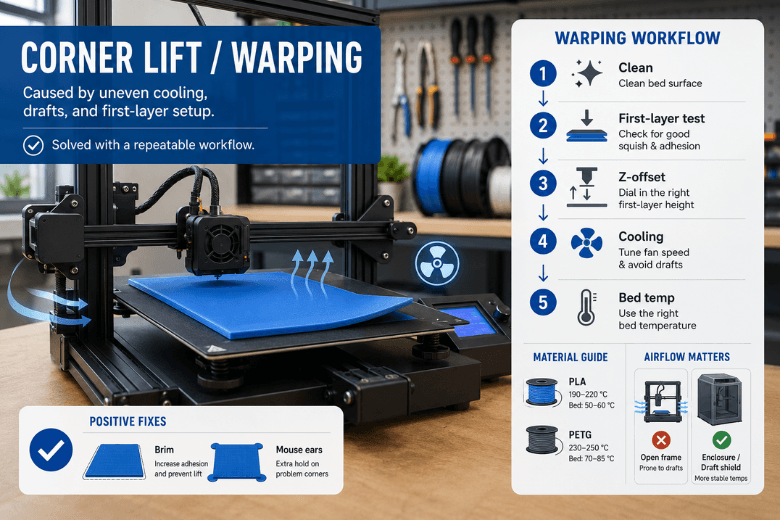
Key takeaways
-
Corner lift is usually a heat-and-airflow problem first, and a bed-adhesion problem second.
-
Standardise your workflow: clean → first-layer test → Z-offset, then touch temperatures and cooling.
-
For PLA, enclosures are mainly for draft control. Keep the chamber cool enough to avoid heat creep.
-
For PETG, a steadier environment often helps — but watch over-adhesion on some surfaces.
The decision table: what to change first (PLA vs PETG)
|
Your situation |
Most reliable setup choice |
First slicer change |
Why it works |
|---|---|---|---|
|
PLA warping on an open-frame printer (large flat parts) |
Draft shield / partially ventilated enclosure |
Reduce early cooling (fan ramp) |
Stops corners cooling first and shrinking first |
|
PLA in an enclosure but you see jams/under-extrusion |
Vent the enclosure / crack the door |
Keep fan gentle early, then normal |
PLA can suffer heat creep if the chamber runs too warm |
|
PETG warping on an open-frame printer |
Enclosure or strong draft shielding + PEI |
Fan off for first layers + brim |
PETG is sensitive to uneven cooling at the base |
|
PETG in an enclosure but one corner still lifts |
Check for uneven airflow / cold drafts |
Add “mouse ears” on the lifting corners |
Fixes the weak corner without overcorrecting the whole profile |
What’s actually happening when corners lift
The mechanism is simple:
-
Plastic shrinks as it cools.
-
If cooling is uneven (drafts, strong fan early on, cold room edge), corners shrink first.
-
That shrinkage creates a peel force; once the edge lifts, the rest of the print is fighting gravity.
If you want a clean, printer-agnostic explanation of the mechanism and common fixes, Xometry’s guide to 3D print warping with PLA, PETG and ABS (2022) is a useful reference.
Choose a bed surface you can keep consistent
In community spaces, the biggest enemy isn’t the slicer — it’s inconsistent surface condition.
PEI (smooth or textured): the practical default
PEI is a strong baseline because it can offer reliable adhesion without relying on “sticky tricks,” as long as it’s kept clean.
If you need a repeatable process to standardise across users, Sovol UK lays out a sensible order of operations in their guide on fixing bed adhesion: clean the surface properly, run a first-layer test, then adjust Z-offset before you chase other settings.
If your fleet uses SV05/SV06-sized beds, a PEI spring-steel plate is an easy standard part to keep on hand (example: PEI flexible steel build plate for SV05/SV06).
Glass: only if you already know why you want it
Glass can work, but it’s less forgiving in cool/drafty rooms. With PETG, it can also stick aggressively depending on surface and prep.
If PETG is sticking too hard (or you’re worried about surface damage), use a thin glue-stick layer as a controlled release layer — and let the bed cool before removal.
Enclosure vs open-frame: the PLA/PETG trade-off
An enclosure does two things well: blocks drafts and stabilises ambient temperature. But it also changes what can go wrong.
PLA: enclose for drafts, not for heat
PLA often doesn’t need a hot chamber, and too much heat can increase the risk of heat creep and jams. Sovol’s enclosure guidance suggests keeping PLA chamber temperature below ~30°C, while PETG can typically run warmer (see Sovol’s enclosure temperature and safety guide (2025)).
Practical rule:
-
If you enclose PLA: use vents/door gaps so you’re controlling drafts without cooking the cold end.
PETG: stability usually helps, but don’t overcool the first layers
PETG tends to punish uneven cooling at the base. A stable enclosure can help — especially in UK workshops where temperature swings and drafts are common.
If you’re considering enclosure hardware for large-format printers, an example option on Sovol UK is the SV08 Max enclosure kit. Treat it as one way to get environmental stability, not a guaranteed fix.
The settings that matter most (in the right order)
When corner lift shows up, troubleshoot with a small test print and change one variable at a time.
1) First-layer contact: Z-offset and bed mesh
If first-layer lines don’t merge into a continuous sheet, corners will always be the first to fail. Follow the clean → test → Z-offset order described in the Sovol UK bed-adhesion guide (linked above).
2) First-layer speed: slow down until it’s boring
A fast first layer doesn’t give the plastic time to wet the surface and bond. As a general reference for what “bed adhesion troubleshooting” includes, Simplify3D’s “Not Sticking to the Bed” guide is a solid baseline.
3) Cooling ramp: stop blasting the corners early
If corners start lifting after a few layers, your fan ramp is a prime suspect.
-
For PLA: start low and ramp to normal.
-
For PETG: keep early cooling conservative; ramp later than you would for PLA.
4) Bed temperature: increase in small steps
Once your first layer is mechanically correct, raise bed temperature in small steps and re-test. Large jumps tend to mask the real issue (drafts, cooling ramp, or contact).
5) Add contact area: brim or mouse ears
If you’re already close to stable, increasing contact area is often the most predictable “last mile” fix. Brims help across the whole edge; mouse ears are great when only two corners are misbehaving.
Next steps
If you want to reduce failure rate across a shared fleet, the fastest win is to standardise a one-page routine based on: clean the bed properly, run a quick first-layer test, dial Z-offset, then tune cooling and bed heat.
Share:
How to Get a Perfect First Layer on an FDM 3D Printer
Why Do 3D Prints Warp and How Can You Stop It?