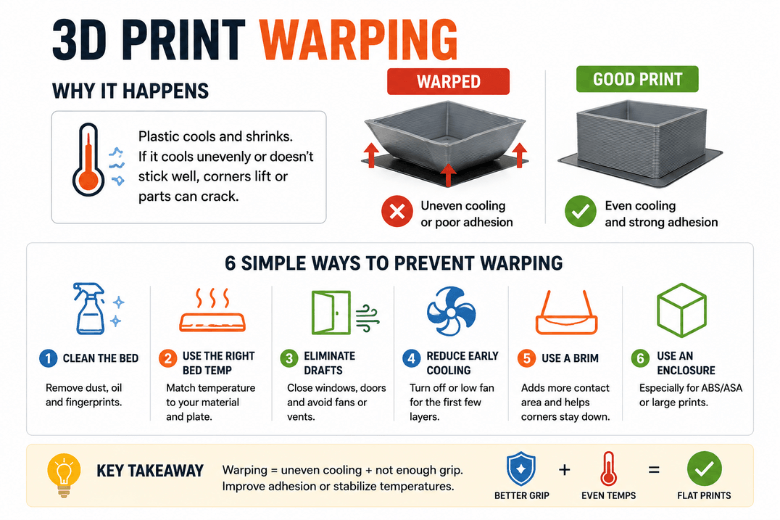
Key Takeaway: Warping happens when thermal contraction and uneven cooling create shrink stress that beats your print’s ability to stay flat (bed grip + even temperatures).
Key takeaways
-
Warping is almost always uneven cooling + insufficient restraint (not “mystery filament”).
-
Fixes work when they either increase restraint (better first layer adhesion) or reduce shrink stress (more even temperatures).
-
The fastest wins are usually: clean bed → solid first layer → block drafts.
-
PLA can warp too — just usually on large, flat parts or in cold/drafty rooms.
Quick diagnosis table (symptom → likely cause → first fix)
|
What you see |
Most likely cause |
First thing to try |
|---|---|---|
|
Corners lift in the first 5–20 layers |
First layer not anchored, or early cooling too aggressive |
Re-do the first layer; reduce early fan; add a brim |
|
One side lifts more than the other |
Draft from a window/door/vent/fan, or uneven bed heat |
Block/move airflow; print more central |
|
Large flat base “potato chips” upward |
Big temperature gradient across the part |
Brim + warmer, steadier ambient |
|
ABS/ASA splits mid-print |
Ambient too cold / cooling too strong; stress beats layer bonding |
Stabilise temperature (often via enclosure) |
Why do 3D prints warp?
At the simplest level, a print warps because hot plastic shrinks as it cools — and it doesn’t cool evenly.
A useful mental model is shrink vs grip:
-
The plastic wants to contract as it drops from extrusion temperature toward room temperature.
-
The first layer (and the build surface) are “gripping” the part and resisting that contraction.
-
If the shrink forces win, you’ll see corner lift, edge curl, or (on some materials) cracking.
Support docs from manufacturers describe the same mechanism: temperature differences create shrinkage stress, and drafts or unstable ambient temperatures make that stress worse. Prusa’s troubleshooting guide is a clear reference point here (Prusa Knowledge Base: “Warping”).
Corner lift vs cracking: two different failure modes
It helps to separate two outcomes that get lumped into “warping”:
-
Corner lift / edge curl: the part is losing the tug-of-war against the bed.
-
Cracking / delamination: the part stays stuck, but internal stress exceeds layer-to-layer strength.
The prevention tactics overlap, but cracking usually means you need more temperature stability and less thermal shock during the print.
The prevention playbook (in the order that saves the most prints)
1) Get bed adhesion right (boring, but it’s the multiplier)
Most warping incidents in a shared workshop start as a first-layer problem.
Focus on three basics:
-
Clean surface: remove oils and residue.
-
Consistent nozzle height across the bed.
-
Slow first layer so the filament has time to bond.
If you’re teaching this to members, make “first layer adhesion” a separate, repeatable skill. Here’s a step-by-step internal guide you can use: How to fix first layer adhesion problems.
2) Match bed temperature to the build surface, not just the filament
Two people can print the “same” material and get totally different results because they changed the plate.
Bambu Lab’s wiki lists incorrect heatbed temperature and plate selection as a top cause of warping and treats “match bed temp + plate type” as a first-order fix (Bambu Lab Wiki: “Printed Model Warping”).
Practical makerspace move:
-
Label your build plates.
-
Keep a short “known good” baseline per plate + material.
3) Remove uneven cooling (drafts are sneakier than settings)
Warping loves an environment that changes mid-print: doors opening, windows, heater cycling, someone pointing a desk fan at the room.
Even PLA and PETG can curl if one side is cooled more aggressively than the other.
Pro Tip: Before you chase slicer tweaks, do a 30‑second walk-around: windows, vents, fans, and doors. If airflow is asymmetric, your print will be too.
4) Control fan behaviour in the first layers
A lot of people crank cooling for better overhangs — and accidentally sabotage the base.
A clean, teachable rule is:
-
Anchor the base first.
-
Then add cooling for quality only as needed.
Bambu Lab explicitly recommends avoiding cooling for the first few layers to support adhesion, then tuning down excessive auxiliary cooling if warping persists (see the same Bambu Lab wiki page linked above).
5) Use geometry helpers when the part is “warp-shaped”
Some parts are just built to warp: long, flat bases; sharp corners; thin footprints.
Use simple helpers:
-
Brim to increase contact area.
-
Mouse ears at corners to spread stress.
-
Orientation that avoids putting long edges in the path of a draft.
If your most common failure is corners lifting, this focused internal guide pairs well with the advice above: How to stop corners lifting on 3D prints.
6) Know when an enclosure is the real fix (especially ABS/ASA)
For ABS/ASA and other higher-shrink materials, you can sometimes brute-force adhesion — but you’re still fighting temperature gradients.
Xometry’s overview of warping across PLA, PETG, and ABS explains why ABS is so unforgiving: higher contraction plus sensitivity to drafts/open-air cooling makes temperature control disproportionately important (Xometry: “3D Print Warping with PLA, PETG and ABS”).
Plain-language guidance:
-
PLA: usually fine open-air.
-
PETG: usually fine open-air, but large parts benefit from steadier ambient.
-
ABS/ASA: treat draft control (often an enclosure) as baseline.
⚠️ Warning: ABS/ASA printing can produce noticeable fumes. In shared spaces, prioritise ventilation and follow your makerspace safety policy.
Material-specific notes (what actually changes)
PLA
PLA is less warp-prone, but it still warps when:
-
the room is cold,
-
there’s a draft on one side,
-
the base is large and flat,
-
the first layer is marginal.
PETG
PETG can curl at edges if cooling is too aggressive or if bed adhesion isn’t consistent. Start by stabilising the first layer and reducing asymmetric airflow.
ABS / ASA
ABS/ASA are more likely to show both:
-
corner lift at the base,
-
and cracking higher up.
The priority is stable temperatures (and avoiding thermal shock), not just “more stick.”
Makerspace / UK-specific “real life” checklist
If your printers live in UK garages, spare rooms, or community workshops, the environment often changes more than your slicer.
-
Assume warping risk rises when the room temperature drops — and treat draft control as part of setup.
-
Standardise build plates (or at least label them clearly) so members aren’t unknowingly changing the adhesion system.
-
Make a first-layer test part part of onboarding.
If you want a deeper internal walkthrough that you can send to members, this post is a good companion: How to fix warping in 3D printing.
FAQ
Can a print warp even if it looks stuck at the start?
Yes. You can have a good first layer and still build stress as the part grows. That’s when you’ll see gradual edge curl, or cracking on ABS/ASA.
Do brims always fix warping?
They help because they increase contact area, but they don’t solve uneven cooling. If a draft is hitting one side, a brim can delay the lift — not prevent it.
Should I always use an enclosure?
Not always. Enclosures are most valuable for higher-shrink materials (ABS/ASA and similar). For PLA, a too-warm chamber can cause different problems.
Next steps
If you want a repeatable routine that prevents warping becoming a weekly fire drill, keep a short maintenance cadence and standardise your first-layer process.
A simple resource that works well as a makerspace handout: The Ultimate Checklist for 3D Printer Maintenance.
Share:
How to Stop Corners from Lifting on 3D Prints
How to Stop Large 3D Prints from Warping