When you run a makerspace (or you’re the person everyone pings when a print fails), the problem isn’t knowing one fix.
It’s knowing what to check first—so you don’t burn an afternoon tweaking slicer settings while the real cause is a dirty build plate, damp filament, or a belt that’s slowly loosening.
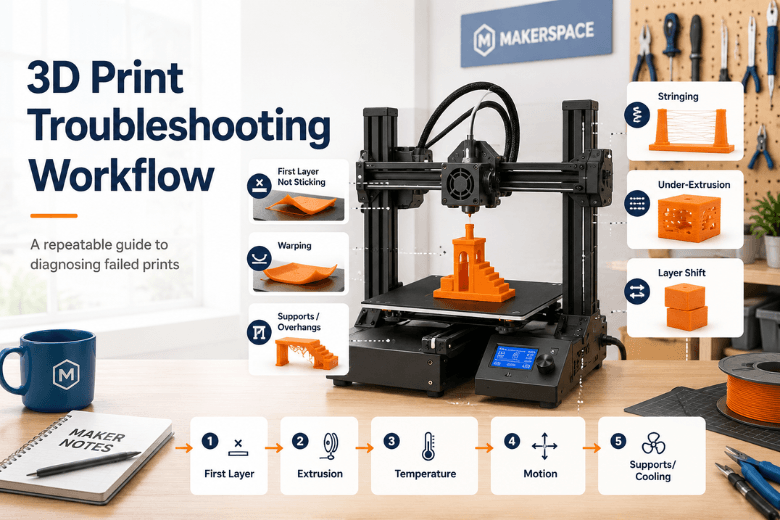
This is a repeatable 3D printing troubleshooting workflow you can teach, print, and reuse across different FDM/FFF machines.
Key takeaways
-
Start by identifying when the print fails (first layer, mid-print, supports) and the dominant symptom.
-
Fix first layer not sticking before you chase retraction, flow, or fancy slicer features.
-
If extrusion looks inconsistent, treat it as a hardware + material problem first (clog, tension, filament path, moisture).
-
Standardise the process: one test print, one change at a time, and a simple log of what worked.
Quick triage: symptom → likely cause → first fix
Use this table to get to a safe first action in 60 seconds.
|
Symptom you see |
Most likely causes |
First fix to try (low risk) |
|---|---|---|
|
First layer not sticking |
Dirty plate, wrong Z offset, bed not trammed, first layer too fast/cool |
Clean plate + run a first-layer test + slow first layer |
|
Corners lifting / 3D print warping |
Uneven cooling, weak adhesion, drafts, bed temp mismatch |
Add a brim + reduce early cooling + block drafts |
|
Fine strands between features (3D print stringing) |
Nozzle temp too high, wet filament, retraction not tuned |
Dry filament (if needed) + drop temp 5–10°C |
|
Thin lines / gaps / “starved” walls (under-extrusion 3D printing) |
Partial clog, extruder slipping, too cold, too fast |
Check extruder slip + test extrusion + clean nozzle |
|
Sudden offsets (layer shift 3D printer) |
Loose belt/pulley, collision, accel too high, binding |
Check belts/pulleys + reduce accel/speed |
|
Supports collapsing / ugly overhangs |
Orientation, weak supports, insufficient cooling |
Reorient part + strengthen support interface + slow overhangs |
If the print is failing in multiple ways, start with first layer and extrusion stability. Those two issues can create a cascade of “symptoms” that aren’t really separate problems.
For a broader symptom list, you can cross-reference Sovol UK’s overview: Why do my 3D prints keep failing? common causes and fixes.
Troubleshoot failed 3D prints: the repeatable 8-step workflow
The rule that saves the most time:
Pro Tip: Don’t change more than one variable per test print. If you stack three changes and it improves, you won’t know which change actually fixed it.
Step 1: Classify the failure (when + what)
Action
-
Note when it fails: first layer, early layers, mid-print, top layers, at supports, after a long travel move.
-
Pick the dominant symptom (from the triage table).
Done when…
-
You can describe the problem in one sentence: “first layer not sticking,” “under-extrusion after 30 minutes,” “layer shift on Y at the same height,” etc.
Step 2: Freeze the variables (so you can reproduce)
Failed prints are hard to fix if every attempt is different.
Action
-
Use the same spool for tests.
-
Use a small, fast test model (first-layer patch, retraction tower, 20 mm cube).
-
Save the current slicer profile under a name like
baseline_before_fixes.
Done when…
-
You can rerun the same test in under 20 minutes.
Step 3: Clean the build plate properly (yes, really)
A huge number of “mystery” failures are just contamination.
Action
-
Clean the plate using the manufacturer-recommended method.
-
Avoid touching the print surface with bare fingers after cleaning.
For first-layer troubleshooting, it helps to know what a “good” test looks like; Bambu Lab’s first-layer test print guide is a clear reference.
Done when…
-
You’ve cleaned the surface and you’re not trying to compensate for oils and residue by over-squishing Z.
Step 4: Fix the first layer before anything else
If the first layer is wrong, everything above it is unstable.
Action
-
Tram/level the bed (mechanical first).
-
Set Z offset with a first-layer test.
-
Slow the first layer.
Prusa’s guidance is blunt: don’t “cheat” adhesion by pushing Z too low—Prusa’s first-layer issues guide explains why over-squish can create new problems.
If you want a dedicated, printer-agnostic checklist, see Sovol UK’s article: Why is my 3D print not sticking to the bed?
Done when…
-
Your first layer lines are continuous, lightly squished, and consistent across the whole plate.
Step 5: Validate extrusion health (before you tune retraction or flow)
If extrusion is inconsistent, slicer tuning becomes guesswork.
Action
-
Watch/listen for extruder clicking or filament grinding.
-
Confirm the spool unwinds freely and the filament path has low friction.
-
Heat the nozzle to printing temperature and do a short manual extrusion test.
If you suspect under-extrusion, start with the basics (idler tension can be too loose or too tight): Prusa’s under-extrusion guide.
If the issue points to moisture (popping, rough surfaces, inconsistent flow), Sovol UK’s explainer is a practical starting point: Why wet filament causes bad 3D prints.
Done when…
-
Extrusion is smooth and consistent, and the extruder isn’t slipping.
Step 6: Tune stringing, warping, and layer bonding (after the printer is healthy)
Once the machine is behaving, you can tune quality.
If you’re seeing stringing
Action
-
Reduce nozzle temperature in 5–10°C steps.
-
If filament is suspect, dry it and keep it dry.
-
Then tune retraction.
Prusa summarises the main causes clearly in Prusa’s stringing and oozing guide.
For ongoing storage (especially in a humid climate), follow a conservative approach: dry first, then store sealed with desiccant; UltiMaker’s filament storage tips covers the basics.
Done when…
-
Travel moves don’t leave hair-like strands on simple tests.
If you’re seeing warping / corner lift
Action
-
Improve bed adhesion (clean plate, better first layer, brim).
-
Reduce drafts and uneven cooling.
-
Use an enclosure only where it makes sense for the material and environment.
Done when…
-
Corners stay down through the first 20–30 layers on a test part.
If you’re seeing weak layer bonding or brittle parts
Action
-
Raise nozzle temperature slightly.
-
Reduce speed.
-
Review part cooling (too much cooling can weaken bonding for some materials).
Done when…
-
A simple test part fails at the expected weak point, not between layer lines.
Step 7: Diagnose motion problems (layer shifts, collisions)
When layers shift, treat it like a motion system problem first.
Action
-
Check belts: tension and condition.
-
Check pulleys: set screws/grub screws tight and aligned.
-
Make sure the axis moves freely and cables aren’t snagging.
-
Reduce acceleration and speed as a diagnostic test.
A solid checklist is Prusa’s layer shifting guide.
Done when…
-
You can run a fast, simple print with repeatable dimensions and no sudden offsets.
Step 8: Fix supports and overhangs (geometry last)
If the printer is healthy but the same model fails on overhangs or supports, focus on geometry and cooling.
Action
-
Reorient the part to reduce unsupported faces.
-
Strengthen supports (especially support interface layers) where needed.
-
Slow overhang regions and tune cooling.
A useful starting heuristic is the common 45° threshold plus targeted overhang slowdown: Bambu Lab’s overhang printing guide.
Done when…
-
Overhangs are consistent on a test piece and supports finish without collapsing.
Standardise this across your community (so you fix fewer prints in the first place)
If you support lots of users, troubleshooting isn’t a one-off. It’s operations.
Here’s what usually makes the difference:
-
Pick 1–2 baseline filaments (e.g., a PLA and a PETG) and keep them dry.
-
Use a single baseline test pack: first-layer patch, retraction test, and 20 mm cube.
-
Create a “known good” profile per printer and lock it for workshops.
-
Log failures with three fields: symptom, what you changed, result.
-
Keep a small spares box (nozzles, PTFE tube, build-surface cleaner, a spare spool).
Sovol UK has a practical maintenance cadence you can adapt into your SOP: The ultimate checklist for 3D printer maintenance.
If your community runs multiple printer types, it can help to standardise on workflow-friendly features (auto bed levelling, stable motion, and a predictable filament path). That’s a useful lens when evaluating any model—including options from Sovol and other brands—because it reduces mentor time more than chasing a small spec advantage.
⚠️ Warning: When troubleshooting, avoid turning one printer into a special snowflake. If a fix can’t be explained and repeated by another mentor, it’s not a makerspace fix—it’s a one-off workaround.
Next steps
-
If your biggest pain is first-layer inconsistency, start with a dedicated first-layer calibration routine and bed-surface discipline.
-
If your biggest pain is inconsistent extrusion, treat filament storage and nozzle health as your “uptime baseline.”
If you want a simple set of links to hand to new members, start with Sovol UK’s cluster articles on bed adhesion, wet filament, and nozzle wear, and pair them with this SOP.
Share:
Why Your 3D Print Looks Bad Even with the Right Settings
How to Fix First Layer Adhesion Problems in 3D Printing