Key takeaways
-
If your profile is “right” but prints are still ugly, the cause is usually material condition, extrusion consistency, first-layer fundamentals, or motion vibration — not another slicer tweak. (That’s why a 3D print can look bad even with the right settings.)
-
A reliable order beats guessing: first layer → extrusion health → temperature → mechanics → cooling.
-
On high-speed/CoreXY printers, pressure advance and input shaping can be the difference between clean corners and “mystery blobs,” even with the same slicer profile.
-
The fastest way to improve a shared-space printer fleet is to treat calibration like unit tests: first-layer test → temperature tower → retraction → flow → pressure advance → resonance.
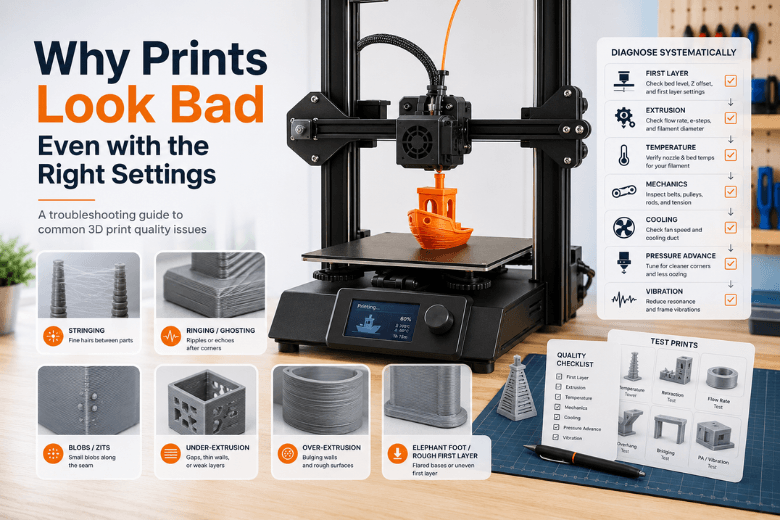
A 2‑minute triage: match the symptom to the first thing to check
If you run a makerspace (or you’re the person everyone asks), you don’t have time to re-slice the same model five times. Use this table to pick the first check that’s most likely to pay off.
|
What you see |
Most likely “bucket” |
Check this first |
Why it helps |
|---|---|---|---|
|
Fine hairs between parts (stringing) |
Material + heat + retraction |
Dry filament and drop nozzle temp slightly |
Moisture and excess heat amplify ooze during travel moves |
|
Ripples after corners (ringing/ghosting) |
Motion/vibration |
Belt tension + acceleration limits |
Vibration shows up as repeating “echoes” on sharp features |
|
Random bumps (zits/blobs), especially at the seam |
Pressure/starts-stops |
Pressure advance + seam placement |
Pressure lag causes extra plastic at speed changes |
|
Thin walls, gaps, weak tops (under‑extrusion) |
Extrusion delivery |
Partial clog + extruder slip |
A sick nozzle/extruder looks like “bad flow” |
|
Bulging walls, mushy detail (over‑extrusion) |
Flow calibration |
Re-check flow / extrusion multiplier |
Too much plastic hides detail and ruins dimensions |
|
A repeating vertical pattern (Z banding) |
Z mechanics |
Lead screw alignment + binding |
Periodic Z motion errors create periodic surface errors |
|
Bad bottom layers (elephant foot / rough base) |
First layer + heat |
Z-offset + bed temp |
First-layer over-squish spreads material outward |
For a broader symptom library, Simplify3D’s print quality troubleshooting guide is a useful reference — but don’t let it tempt you into changing five settings at once.
Why your 3D print looks bad even with the right settings
If you’re already using a sensible profile and the print still comes out rough, it usually means something outside the slicer is drifting: filament condition, extrusion health, first-layer fundamentals, or motion.
This article is built to help you diagnose those root causes quickly — without turning troubleshooting into a week-long settings hunt.
The order that stops settings‑chasing (and works across printer brands)
Most troubleshooting guides converge on the same operator discipline: fix fundamentals first, then tune. A practical order is:
-
First layer (bed cleanliness, tramming/levelling, Z-offset, first-layer speed)
-
Extrusion health (nozzle condition, clogs, extruder grip, filament path friction)
-
Temperature (nozzle and bed stability, small controlled changes)
-
Mechanics / motion (belts, pulleys, bearings, frame rigidity, acceleration)
-
Cooling and geometry (fan performance, overhang settings, part orientation)
This matches the “start with the first layer” mindset you’ll see in resources like Prusa’s first-layer issues checklist and broader troubleshooting overviews like the MatterHackers troubleshooting guide.
Pro Tip: Make one change, then print a small diagnostic model. If you can’t describe what the change was supposed to do, you’re not troubleshooting — you’re gambling.
The uncomfortable truth: “right settings” don’t survive contact with reality
When someone says, “I’m using the right settings,” they often mean:
-
they’re using a known profile
-
the slicer preview looks sane
-
the printer starts reliably
All good. But quality problems can come from places the slicer can’t see.
1) Filament can ruin a perfect profile
Even with the same temperatures and retraction values, two spools can behave differently. Common quality killers:
-
Moisture (stringing, popping, rough surfaces, inconsistent flow)
-
Brittleness (snapping, intermittent under-extrusion)
-
Drag on the spool path (extruder skipping on long retractions or fast accelerations)
If you’re diagnosing across a community, standardise the basics: dry storage, labelled spools, and a quick “does this spool feel normal?” check.
If you want a simple internal reference for members, Sovol’s guide on signs your filament needs better storage (and why it can snap) is a good starting point.
2) A partial clog looks like “bad slicer settings”
Under-extrusion isn’t always a flow number problem. It’s often a delivery problem:
-
nozzle wear (especially if you print abrasive filaments)
-
burnt residue in the hotend
-
inconsistent extruder grip (chewed filament, dust in the gears)
If you see random gaps that come and go, treat it like a health check first — don’t immediately tune flow.
A maintenance checklist helps reduce how often you end up here. Sovol’s 3D printer maintenance checklist is an easy reference to keep printers predictable in shared spaces.
3) First-layer “almost good” is still bad
A first layer that is nearly right can still create downstream ugliness:
-
inconsistent bed contact can cause subtle warping that shows up later
-
a slightly wrong Z-offset can create elephant foot, rough bases, or inconsistent line width
If you’re teaching beginners: first layer is not a vibe — it’s a measurable outcome. You want smooth, consistent lines with no gouging and no gaps.
4) Your environment is part of your settings
UK workshops and garages add their own variables:
-
colder ambient temps (more shrinkage, more warping risk)
-
drafts (weird corner lift, inconsistent cooling)
-
shared surfaces (printer on a wobbly table increases vibration)
If a printer “prints badly at high speed” only on one bench, that’s not a slicer profile. That’s physics.
High-speed/CoreXY printers: why good profiles don’t transfer cleanly
High-speed printers (often CoreXY, often running Klipper) are less forgiving. They can produce excellent results — but only when the motion system and pressure compensation are dialled in.
Two concepts matter here:
-
Pressure advance: compensates for the delay between pushing filament and plastic actually leaving the nozzle during acceleration changes.
-
Input shaping: reduces ringing by counteracting the printer’s resonance.
If pressure advance is off, you’ll often see blobby corners, inconsistent line width at speed changes, and ugly seams. If input shaping (or mechanical stiffness) is the bottleneck, you’ll see ringing/ghosting that gets worse as you push acceleration.
This is why a “perfect” slicer profile can still produce ugly prints at speed: the printer is physically overshooting and undershooting.
A calibration stack you can teach (and repeat every time you change filament)
If you want fewer arguments about “the right settings,” give members a workflow that produces evidence.
Here’s a practical sequence, aligned with common calibration checklists like the Teaching Tech calibration guide:
Step 1: First-layer test
What it reveals: bed level, Z-offset, adhesion.
Good looks like: even lines, consistent squish, no scraping, no gaps.
Step 2: Temperature tower
What it reveals: the best compromise between layer bonding, stringing, and detail for that filament.
Rule: change temperatures in small steps. Don’t swing 20°C and hope.
Step 3: Retraction test
What it reveals: stringing and travel artefacts.
Note: temperature strongly affects stringing — do temperature first.
Step 4: Flow calibration (single-wall or known wall thickness test)
What it reveals: whether you’re consistently over- or under-extruding.
Why it matters: flow errors hide in plain sight until you print something with tolerances.
Step 5: Pressure advance (for fast printers)
What it reveals: corner bulging, start/stop blobs, seam ugliness.
When to do it: after temperature and flow are close.
Step 6: Resonance / input shaping (for Klipper/high-speed)
What it reveals: what accelerations you can realistically run without visible ringing.
Important: input shaping can’t fix a loose belt or a shaky table.
Key Takeaway: If you standardise this sequence across your printers, you’ll stop having “settings discussions” and start having “evidence discussions.”
When it’s time to stop tuning and replace the consumable
There’s a point where further tuning is a waste of time. In shared spaces, make these swap decisions fast:
-
Nozzle: if extrusion becomes inconsistent despite dry filament and stable temperatures
-
Build surface: if adhesion becomes unpredictable even after cleaning and re-tramming
-
PTFE tube / wear parts: if you see intermittent feeding issues that return quickly
One reason calibration can mislead is that we sometimes measure the wrong thing. CNC Kitchen makes this point sharply in why calibration cubes can mislead (2024): it’s easy to “tune” a cube and still have real parts fail.
Next steps
If you want a more detailed workflow you can share with your community, start with this internal guide: Sovol’s calibration workflow for better print quality.
And if you’re trying to keep a printer fleet stable (especially in a makerspace), a simple maintenance routine will do more for print quality than endless micro-tuning.
Share:
How to Reduce Failed Prints on FDM 3D Printers
How to Troubleshoot Failed 3D Prints Step by Step