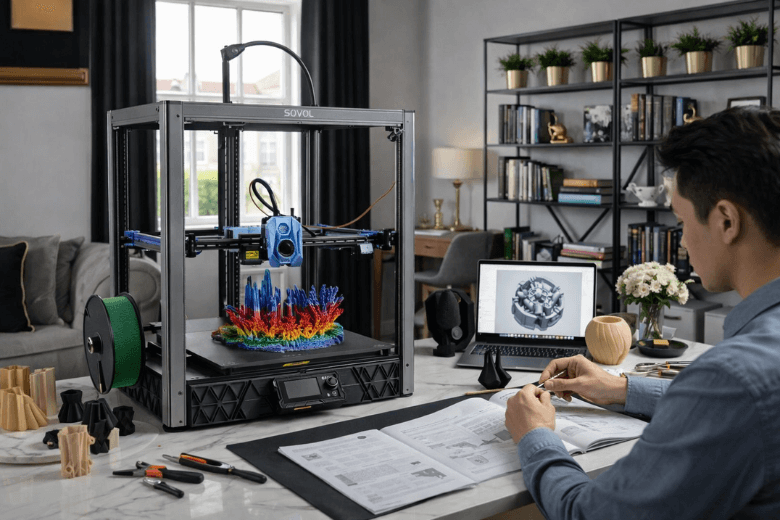
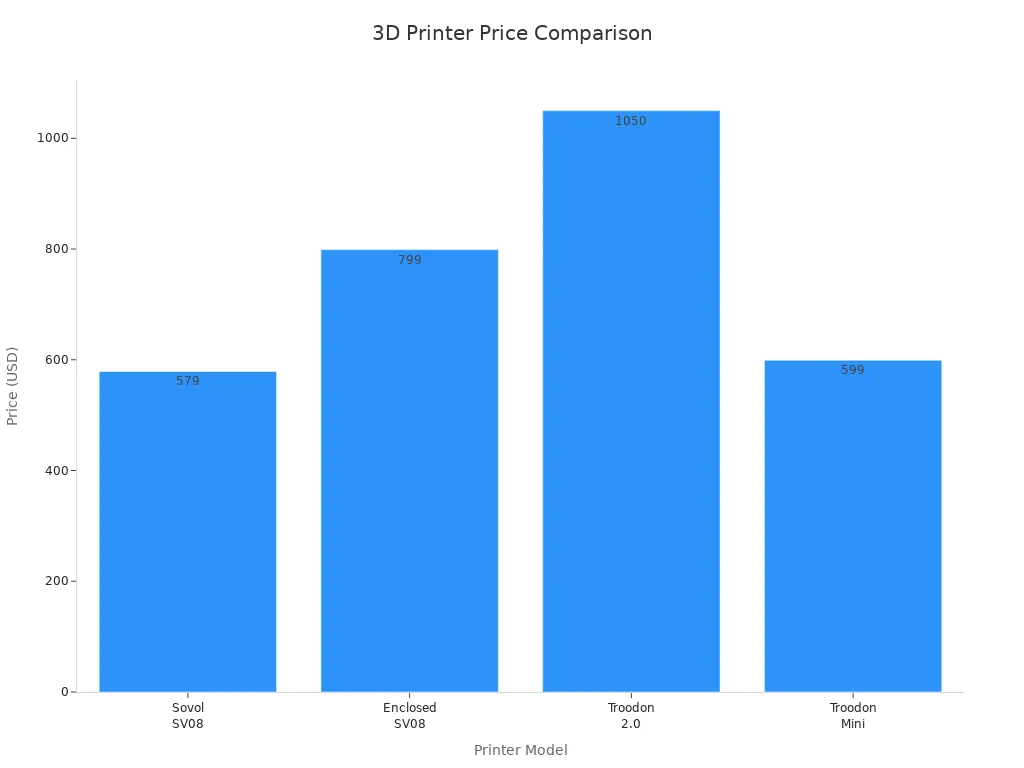
You will find the SV08 3D Printer a practical choice if you are new to 3D printing. Its clear design and mostly pre-assembled parts help you get started quickly. You can expect a straightforward setup without the frustration of complex kits. At a price of $579, it remains more affordable than many alternatives, as shown below:
|
Printer |
Price |
|---|---|
|
Sovol SV08 |
£389 |
|
Enclosed SV08 |
$799 |
|
Troodon 2.0 |
$1,050 |
|
Troodon Mini |
$599 |
You may need to do some initial research to achieve the best results, but the learning curve stays gentle.
Key Takeaways
-
The SV08 3D Printer is beginner-friendly, with most parts pre-assembled for quick setup in under an hour.
-
Auto-levelling and Z-offset features simplify calibration, helping you achieve better print quality from your first attempt.
-
The printer supports a variety of materials, including PLA and ABS, allowing you to explore different projects.
-
Regular maintenance, like cleaning the print bed and checking filament, enhances print reliability and quality.
-
Join online communities for tips and troubleshooting advice to improve your 3D printing experience.
SV08 3D Printer for beginners
Suitability verdict
You will find the SV08 3D Printer a strong contender if you are new to 3D printing. The design focuses on simplicity and accessibility, which helps you avoid the frustration that often comes with more complex machines. Many users have commented on the quick assembly process, with most managing to set up the printer in under an hour. This rapid setup stands out, especially when compared to other models that require extensive tinkering.
You benefit from several features that make the SV08 3D Printer approachable:
-
The user interface uses a standard click wheel, which allows you to navigate menus with ease.
-
An HDMI port lets you connect external displays, giving you a clearer view and more control.
-
Induction auto-levelling ensures the print bed remains even, reducing the risk of failed prints.
-
Automatic Z-offset adjustment simplifies calibration, so you spend less time troubleshooting.
Tip: If you are new to 3D printing, take advantage of the auto-levelling and Z-offset features. These tools can save you time and help you achieve better results from your first print.
However, you should be aware of some challenges. Users have reported occasional issues with bed adhesion, which can lead to failed prints. The temperature sensitivity of the probe may also affect print consistency, especially when calibrating the Z-offset. Despite these minor hurdles, most beginners find the SV08 3D Printer delivers a positive experience straight out of the box.
Here is a summary of beginner feedback:
|
User Feedback |
Summary |
|---|---|
|
Quick Assembly |
Users have successfully assembled the printer within an hour. |
|
Tinkering Required |
Some users feel the printer suits those who enjoy tinkering. |
|
Positive Reviews |
Many video reviews highlight a smooth out-of-the-box experience. |
|
Z Offset Issues |
Some users report technical challenges with Z-offset calibration. |
Intended audience
You will appreciate the SV08 3D Printer if you want a balance between ease of use and the opportunity to learn. This printer suits:
-
Beginners who want to start printing quickly without building a machine from scratch.
-
Hobbyists who enjoy experimenting and tweaking settings for optimal results.
-
Students and educators who need a reliable tool for classroom projects or demonstrations.
If you prefer a completely hands-off experience, you may encounter some minor frustrations, such as occasional bed adhesion problems or the need to adjust the Z-offset. However, if you enjoy learning and problem-solving, the SV08 3D Printer offers a rewarding introduction to 3D printing. You gain access to advanced features without feeling overwhelmed, making it a practical choice for those taking their first steps in this field.
Assembly
What’s included
When you open the SV08 3D Printer box, you find most of the main components already assembled. The package contains the fully assembled and wired base, a robust top plate, the gantry, and all necessary fasteners. You also receive a toolkit with essential hex keys, a power cable, and a quick-start guide. This approach reduces the risk of missing parts and helps you avoid the confusion that often comes with more complex kits.
Setup steps
You can assemble the SV08 3D Printer in just a few straightforward steps:
-
Start with the base, which arrives fully assembled and pre-wired. Place it on a stable surface.
-
Attach the top plate. This single machined aluminium cap locks the corners together and adds rigidity.
-
Install the gantry. Insert it at an angle, then secure it by tightening two bolts in each corner.
You do not need advanced tools or technical knowledge. The process feels intuitive, even if you have never built a 3D printer before.
Beginner tips
You will appreciate the quick setup, especially if you compare it to more advanced kits. The table below highlights the difference:
|
Feature |
SV08 Assembly Time |
Voron Assembly Time |
|---|---|---|
|
Assembly Complexity |
Simple |
Complex |
|
Time Required |
Approximately 40 hours |
|
|
Pre-assembled Parts |
Yes |
No |
|
Customisation Level |
Limited |
Extensive |
Tip: Take your time when tightening bolts. Over-tightening can damage the frame, while loose bolts may affect print quality.
You may encounter minor challenges, such as aligning the gantry or connecting cables. If you follow the instructions step by step, you will avoid most common mistakes. The SV08 3D Printer’s mostly pre-assembled design means you spend less time building and more time printing.
Features
Auto-levelling
You will appreciate the advanced auto-levelling system on the SV08 3D Printer. This feature removes much of the guesswork from bed calibration, which often frustrates beginners. The printer uses a combination of mesh levelling, induction sensors, and automatic Z-offset adjustment. These technologies work together to ensure your print bed remains perfectly level, even if you move the printer or change surfaces. The table below outlines how each feature benefits you as a beginner:
|
Feature |
Benefit for Beginners |
|---|---|
|
Camp technology for mesh leveling |
Ensures precise adjustments only where necessary, enhancing print accuracy. |
|
Induction auto-leveling |
Achieves consistent and accurate bed leveling, simplifying the calibration process. |
|
Auto Z-offset adjustment |
Streamlines setup, ensuring hassle-free calibration and optimal print quality. |
Tip: Let the printer handle levelling. You will save time and avoid common calibration errors.
User interface
You will find the user interface on this printer intuitive and beginner-friendly. The design of CoreXY printers, including this model, focuses on simplicity. You receive clear instructions for both setup and operation. The menu system uses a click wheel, which helps you navigate options quickly. Many first-time users report that they learn the controls within minutes.
-
You can follow step-by-step prompts during setup.
-
The interface displays clear status updates and error messages.
-
You will not need to memorise complex commands.
Build volume
The SV08 3D Printer offers a generous build volume, allowing you to print larger models or multiple smaller parts in one session. This flexibility supports a wide range of projects, from prototypes to functional parts. You can experiment with different print sizes without feeling restricted by the machine’s capacity.
Safety
Safety features on this printer help protect you and those around you. The table below highlights key elements designed for peace of mind:
|
Safety Feature |
Description |
|---|---|
|
Full Enclosure Kit |
Maintains a consistent temperature, reducing warping and improving print quality. |
|
Protection from Moving Parts |
Shields you from accidental contact, making it safer for homes with children or pets. |
|
Noise Dampening |
Reduces operational noise, allowing you to work or study without distraction. |
Note: If you plan to use the printer in a shared space, the noise dampening and enclosure features will make your experience more comfortable.
Experience
First prints
You will notice the SV08 3D Printer offers a smooth start for your first projects. The auto-levelling system works well, so you do not need to spend much time adjusting the bed. You can load the included sample filament and select a test model from the SD card. The printer guides you through the process with clear prompts on the display. Most users report that their first print completes without major issues. You may see some minor stringing or uneven edges, but these results are common for entry-level machines. You can improve your results by cleaning the bed and checking the filament path before each print.
Tip: Always watch the first layer as it prints. A good first layer helps prevent failed prints and saves you time.
Print quality
You will find the print quality of the SV08 3D Printer stands out among beginner models. The advanced mesh levelling and induction auto-levelling help you achieve consistent results. The ceramic cartridge-style hotend reaches up to 300°C, so you can print with a wider range of materials. You will see sharper details and smoother surfaces compared to many entry-level printers. The larger build volume lets you print bigger models without splitting them into parts.
Here is a comparison of key features:
|
Feature |
SV08 3D Printer |
Other Beginner Printers |
|---|---|---|
|
Mesh Levelling |
Yes (advanced mesh levelling technology) |
Varies (often basic levelling) |
|
Auto-Levelling |
Induction auto-levelling |
Often manual or basic auto-levelling |
|
Hotend Type |
Ceramic cartridge-style hotend |
Varies (often standard hotends) |
|
Maximum Temperature |
300°C |
Typically lower (around 240°C) |
|
Build Volume |
Larger than many competitors |
Generally smaller |
|
Noise Level |
Noisy fan |
Varies (some quieter options available) |
You may notice the fan produces more noise than some quieter models. If you print in a shared space, you might want to consider this factor.
Software compatibility
You can use the SV08 3D Printer with popular slicing software such as Cura, PrusaSlicer, and SuperSlicer. The printer accepts standard G-code files, so you do not need to learn a new workflow. You can download profiles from the Sovol community or create your own. The printer supports USB and SD card input, which gives you flexibility in how you transfer files. You will find plenty of online guides and video tutorials for setting up your software. If you want to try advanced features, you can adjust settings like print speed, temperature, and retraction in your slicer.
Note: Start with the recommended profiles for your filament type. You can experiment with settings as you gain confidence.
Operation tips
You will get the best results if you follow a few simple habits. Clean the print bed before each job to improve adhesion. Check the filament spool for tangles or knots. Update the firmware when new versions become available. If you see issues such as poor bed adhesion or stringing, you can adjust the Z-offset or re-level the bed. You may want to print a calibration cube to check dimensional accuracy. If you plan to print with high-temperature materials, use the enclosure kit to maintain a stable environment.
-
Watch the first layer closely.
-
Keep the printer in a well-ventilated area.
-
Store filament in a dry box to prevent moisture problems.
Tip: Join online forums or user groups. You will find troubleshooting advice and print profiles shared by other owners.
You may need to do some initial research to optimise your settings. The learning curve remains gentle, but you will benefit from reading guides and watching setup videos. With regular practice, you will see steady improvement in your print quality and confidence.
Drawbacks
Common issues
You may encounter several recurring issues when using the SV08 3D Printer. Many users report inconsistent bed adhesion, which often leads to failed prints. The printer’s probe can show discrepancies in Z-offset calibration, especially when the temperature fluctuates. Filament loading sometimes proves troublesome, as the filament end may require trimming or adjustment before it feeds smoothly into the extruder.
-
Inconsistent bed adhesion causing print failures
-
Z-offset calibration errors due to probe temperature sensitivity
-
Filament loading difficulties that need manual adjustment
Tip: If you notice the filament not feeding properly, cut the filament end at an angle for easier insertion.
Limitations
You should understand the limitations of the SV08 before starting your first project. The printer’s bed adhesion remains a challenge, particularly for the first layer. This can affect the overall quality and reliability of your prints. Z-offset calibration does not always remain consistent, as the probe’s sensitivity to temperature changes can introduce errors. Filament loading also requires attention, as the extruder may not grip the filament unless you prepare the end correctly.
-
Bed adhesion can be unreliable, especially for the first layer
-
Z-offset calibration may drift with temperature changes
-
Filament loading sometimes needs extra care
These limitations do not prevent you from achieving good results, but they do require patience and a willingness to adjust your process.
Troubleshooting
You can address most common problems with a few practical steps. For bed adhesion issues, many users find that third-party adhesives or textured build plates improve reliability. If you experience Z-offset calibration drift, start your print from a cold state or add a heat soak delay to your start macro. This allows the probe to stabilise before calibration. For filament loading, trim the filament end to a sharp angle and ensure it enters the extruder smoothly.
-
Use third-party adhesives or textured plates for better bed adhesion
-
Begin prints from a cold state or add a heat soak delay to stabilise the probe
-
Trim filament ends to improve loading success
Note: Regular maintenance and small adjustments will help you overcome these challenges and achieve consistent print quality.
Comparison
SV08 vs Ender 3
You may consider the Ender 3 a classic entry-level 3D printer. It offers a low price and a large community for support. However, you will spend more time on assembly and manual calibration. The SV08 3D Printer arrives mostly pre-assembled. You can start printing within an hour. The SV08 includes auto-levelling and a higher maximum nozzle temperature. These features allow you to print with more materials and reduce setup errors. The Ender 3 requires manual bed levelling, which can frustrate beginners. If you want a smoother start and advanced features, the SV08 provides a better experience.
|
Feature |
SV08 3D Printer |
Ender 3 |
|---|---|---|
|
Assembly Time |
< 1 hour |
2–3 hours |
|
Auto-Levelling |
Yes |
No |
|
Max Nozzle Temp |
300°C |
255°C |
|
Build Volume |
Larger |
Standard |
|
Price |
Higher |
Lower |
SV08 vs Kobra
The Anycubic Kobra also targets beginners. You will find both printers offer auto-levelling and user-friendly interfaces. The SV08 3D Printer stands out with its robust frame and higher temperature range. You can print larger models and use more demanding filaments. The Kobra has a smaller build volume and a lower maximum temperature. If you value flexibility and print size, the SV08 gives you more options. The Kobra costs less, but you may outgrow its capabilities as your skills improve.
Value
You invest more in the SV08 3D Printer than in some rivals. The price ranges from $529 to $787, depending on features and bundles. You receive a machine that reduces setup time and supports advanced materials. The auto-levelling and sturdy design help you avoid common beginner mistakes. You save time and effort, which adds value beyond the initial cost. If you want a printer that grows with your skills, the SV08 justifies its price.
Note: Consider your long-term goals. A higher upfront cost can mean fewer upgrades and less frustration later.
You will find the SV08 3D Printer offers a strong balance of user-friendly features and reliable performance for beginners. Its quick assembly, auto-levelling, and robust build make it ideal if you want to learn and experiment. You should consider this model if you value easy setup and future flexibility. For best results, place the printer on a stable surface, clean the bed after each use, and lubricate moving parts monthly. Regular calibration and careful inspection of belts and nozzles will help you achieve consistent, high-quality prints.
FAQ
How long does it take to assemble the SV08 3D Printer?
You can complete the assembly in under one hour. Most parts arrive pre-assembled, so you only need to attach the gantry and top plate. The included guide provides clear instructions.
What materials can you print with the SV08?
You can print with PLA, PETG, ABS, and TPU. The ceramic hotend reaches 300°C, so you can also try advanced filaments. Always check the filament’s recommended temperature before starting.
Do you need to manually level the bed?
The SV08 features automatic mesh levelling and Z-offset adjustment. You do not need to level the bed manually. Let the printer handle calibration for consistent results.
Is the SV08 noisy during operation?
You may notice some fan noise while printing. The enclosure kit and noise dampening features help reduce sound. If you print in a shared space, consider placing the printer in a separate room.
Share:
Large Build Volume 3D Printers for UK Homes
Why Sovol SV08 Printer wins hearts over other printers