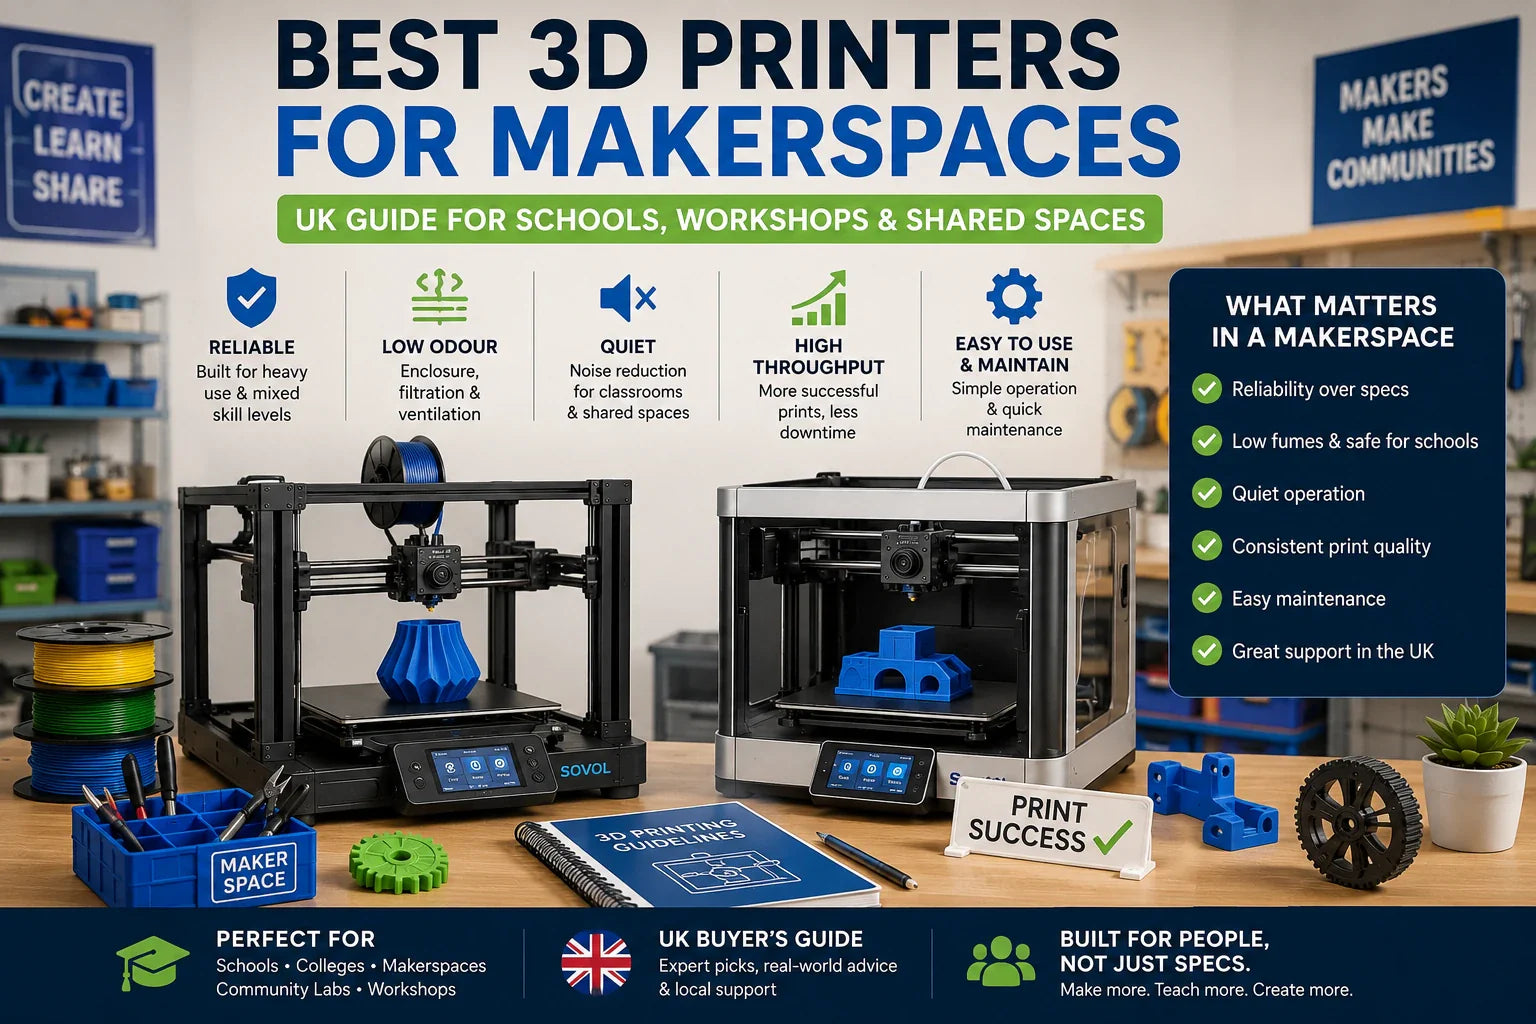
If you run a makerspace, mentor a school club, or you’re the person everyone asks before they buy a printer, you don’t need another list of “features”. You need a reliable 3D printer for makerspace use (and a workflow) that survives real life: mixed-skill users, long queues, noisy rooms, and the kind of prints that fail at 92%.
This guide is built for decision-stage buying in the UK. By the end, you’ll have:
(If you’re specifically choosing a 3D printer for schools, the safety and noise sections below are the ones to treat as non-negotiable.)
-
a short, practical checklist of what actually matters
-
red flags that prevent buyer’s regret
-
scenario-based recommendations (including evidence-based Sovol picks)
Key takeaways
-
For shared spaces, a “good printer” is the one that produces successful parts per week, not the one with the highest headline mm/s.
-
If you care about low fumes/odour + school-safe use, treat enclosure + filtration + ventilation as part of the system, not an optional upgrade.
-
Noise is mostly vibration + fans. Start with stability (mass + isolation), then add an enclosure.
-
Standardising on 2–3 “fleet profiles” and a simple maintenance cadence often improves throughput more than chasing speed.
Step 1: Choose the right printing process for the environment (FFF first, resin only when you must)
For home, schools, and workshops, the safest default is usually FFF/FDM (filament) printing with sensible controls.
Resin printers can be brilliant for high-detail work, but they also introduce extra exposure points: liquid resin handling, washing, curing, and stronger odours in many setups. For many school and makerspace programmes, that’s a big operational overhead.
If your curriculum or projects require resin detail, build the process first (ventilation, PPE, a wash/cure station, and strict handling rules). If not, keep it simple and run FFF well.
According to the University of Edinburgh’s guidance on 3D printers, enclosure/filtration and controlled workflows matter, and they even recommend leaving a filtered enclosure in place for a short clearance time after printing.
Key Takeaway: In shared spaces, complexity is a cost. Default to FFF unless resin detail is a hard requirement.
Step 2: Evaluate air quality and odour like a facilities problem, not a “printer spec”
“Does it smell?” is the question people ask. The better question is: what are you doing to manage emissions and exposure in an indoor room with multiple users?
A practical, buyer-friendly way to think about it:
Must-haves for low fumes/odour in shared spaces
-
An enclosure (or a plan to add one)
University safety guidance commonly pushes toward enclosed, filtered setups for indoor use. Edinburgh’s guidance recommends enclosed printers (or retrofitted enclosures) and a short clearance window before opening after printing. -
Filtration that matches the risk
A common baseline is particulate filtration (HEPA) plus activated carbon for VOCs, paired with sensible room ventilation. For a practical overview of 3D printer fumes and ventilation, see All3DP’s 3D printing emissions & air quality guide (2024). -
Material policy (yes, it matters)
If you’re teaching beginners or printing indoors, pick the easiest, lowest-drama material as your default. Sovol’s guide to PLA filament pros, cons and best use cases frames PLA as a strong teaching filament and a reliable baseline (with ventilation still recommended).
⚠️ Warning: Don’t treat “open a window” as a complete plan. Build an enclosure + filtration + ventilation approach that matches how long printers run and how close people work to them.
Step 3: Make “quiet enough” a requirement (or your classroom will hate you)
Noise is rarely one thing. It’s the combination of:
If your goal is a quiet 3D printer setup, focus on vibration control and fan noise before you start swapping electronics.
-
stepper motor whine
-
fan noise
-
vibration transferred into the desk (this is the big one in many spaces)
A noise reduction stack that scales across a fleet
-
Stability first: mass + isolation
CNC Kitchen’s experiment on reducing noise with a concrete paver is a useful mental model: add mass, then decouple vibration from the surface. -
Enclosure second
An enclosure reduces perceived noise and also helps with emissions control. Two wins. -
Maintenance third (don’t ignore it)
Rattles, worn bearings, and loose belts turn “normal printer noise” into something genuinely disruptive. Tom’s Hardware has a practical checklist in How to fix a noisy 3D printer (2023).
Pro Tip: If you’re buying for a school, assume you’ll run multiple machines. Pick a setup you can repeat: same isolation base, same enclosure approach, same placement rules.
Step 4: Treat throughput as a system (and stop shopping by mm/s)
If you’re mentoring students or running workshops, “speed” isn’t the headline max. Speed is what happens when your users:
-
can start a print without re-levelling for 20 minutes
-
don’t waste half a spool to stringing
-
don’t fail prints because someone used a mystery profile
Sovol’s makerspace-oriented breakdown of speed vs throughput makes a point many teams miss: real-world throughput is closer to successful parts per week minus failures, rework, and mentoring overhead.
What to look for (hardware)
For shared spaces, prioritise features that prevent predictable failures:
-
reliable auto-levelling (to protect first layers)
-
filament runout detection
-
power-loss resume
-
monitoring (camera helps, especially when printers are in a separate room)
What to standardise (workflow)
-
Create 2–3 fleet profiles (fast / balanced / quality).
-
Default beginners to PLA.
-
Use one “baseline test print” after any maintenance.
-
Keep spare consumables on hand (nozzles, bedsheets, spare filament) so downtime doesn’t become a two-week delay.
3D printer for home, school and workshop: shortlist checklist
Here’s a practical decision checklist. You can score each printer 0–2 (no / partial / yes), then compare totals.
Safety + shared-space readiness
-
Is it enclosed (or is there an enclosure option that doesn’t feel like a hack)?
-
Is there a clear plan for filtration and ventilation?
-
Can you limit access to hot/moving parts?
Noise control
-
Can you isolate it on a stable base easily?
-
Is enclosure compatible with how you’ll use it?
-
Is maintenance simple enough for mentors to keep it quiet?
Throughput and reliability
-
Auto-levelling that’s repeatable across users
-
Runout detection + power-loss recovery
-
Easy-to-maintain toolhead/hotend
-
Remote monitoring if printers sit in a separate room
Total cost of ownership (TCO)
-
Are spares easy to get in the UK?
-
Is support/documentation good enough for non-experts?
-
Can you standardise settings across multiple units?
Sovol recommended picks (evidence-based, scenario-specific)
These aren’t “best for everyone” recommendations. They’re scenario picks mapped to the constraints you said matter: low odour risk, lower noise, safer workflows, and strong throughput.
Pick A: Compact, enclosed option for classrooms and small rooms — Sovol Zero
If your environment is noise-sensitive and you want a printer that arrives as a more self-contained unit, the Sovol Zero is worth a look.
Why it fits the brief:
-
It’s shipped as a complete machine with an enclosure.
-
The product page describes an air filtration system aimed at filtering VOCs/particles.
-
It’s small enough to make “put it in a dedicated corner” realistic.
Trade-offs to be honest about:
-
Smaller build volume (around 152 mm cube) means you’ll split larger student projects.
-
High-speed machines can still be loud if vibration isn’t managed; even enclosed printers need good placement.
Pick B: High-throughput maker community workhorse with open-source flexibility — Sovol SV08
If you want a machine that can handle bigger parts and you value open-source-friendly tinkering and tuning, the Sovol SV08 is positioned as a CoreXY, open-source, high-acceleration platform.
Why it fits the brief:
-
It supports very high acceleration and lists a max flow rate; those factors matter for real-world throughput.
-
It includes automatic bed levelling and remote monitoring features (camera) on the product page.
-
Enclosure is offered as an option, which matters if you’re prioritising odour control and noise damping.
Trade-offs to be honest about:
-
More capability typically means more setup and tuning compared to a simple classroom appliance.
-
If the printer needs an enclosure to meet your air/noise constraints, budget for it up front.
Pick C: Large-format workshop printer for big functional parts — Sovol SV08 Max
If your workshop needs large build volume for props, jigs, or large prototypes, the Sovol SV08 Max is aimed at large-format printing.
Why it fits the brief:
-
Big build volume reduces the need to split models.
-
The page lists runout detection, power-loss recovery, clog/tangle detection, and remote monitoring.
Trade-offs to be honest about:
-
Big printers need big enclosures (if you want them), and they’re harder to place in a classroom.
-
Large, fast-moving gantries can amplify noise if you don’t invest in a stable base.
UK-specific buying checks (don’t skip these)
When you’re buying for a school or a community space, logistics are part of uptime.
Before you standardise on any printer, confirm:
-
where it ships from
-
typical delivery times
-
how you get spare parts
Sovol’s UK Help Center states orders ship from a UK warehouse in most cases, with typical delivery windows and guidance on sourcing parts not listed online.
Next steps
If you want to shortlist quickly, start here:
-
Decide your default process (FFF for most shared spaces).
-
Pick your air/noise strategy (enclosure + filtration + placement).
-
Standardise two profiles and one baseline test print.
If you’re ready to compare options, start with Sovol’s UK-stocked 3D printers collection and score each model against the checklist above.
FAQ
Are 3D printers safe for schools?
They can be, but “safe” comes from the full system: an enclosed/filtered setup, ventilation, materials policy (often PLA by default), and controlled procedures. University safety guidance is a good baseline for building a school-safe workflow.
Do I need an enclosure if I only print PLA?
PLA is often the easiest material to teach and tends to be lower-odour than hotter materials, but ventilation still matters. If you’re printing in a shared room (especially multiple printers), an enclosure can help both emissions control and noise.
What matters more: speed or throughput?
Throughput. A printer that prints “fast” but fails often will lose to a slower printer that produces reliable parts day after day. That’s why the “successful parts per week” framing is a useful way to evaluate machines.
Share:
FDM vs Resin 3D Printer: Which Is Better for Home Users?
Buying a 3D Printer in the UK: What You Should Check First (2026)