If you’re running prints for a makerspace, a school lab, or a community group, “just slow down” isn’t really a solution. You don’t have one printer and unlimited time — you’ve got a queue, mixed skill levels, and a responsibility to keep success rates high.
The good news: a lot of “cleaner print” improvements are time-neutral once you’ve tuned them. The trick is knowing which knobs affect surface cleanliness (stringing, zits, ringing) versus which knobs simply reduce throughput.
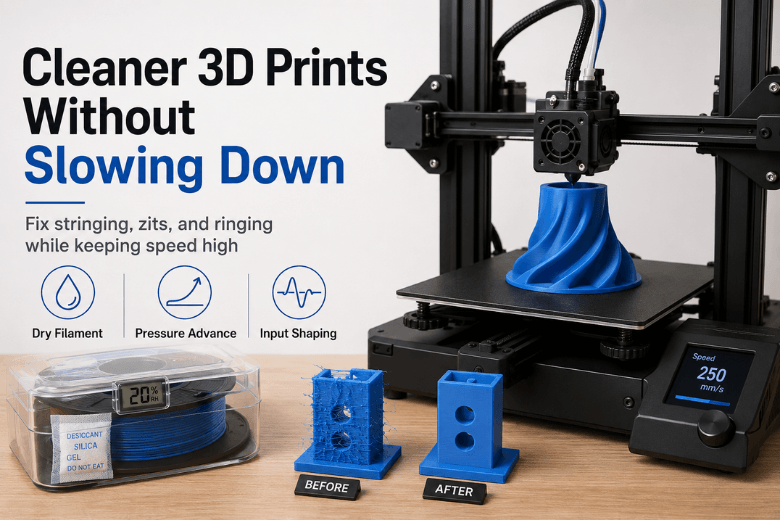
Key takeaways
-
Start with time-neutral fixes: dry filament + correct temperature/flow + pressure advance/linear advance + input shaping.
-
If you must slow something down, slow only what the eye sees (outer walls, overhangs, tiny layers) — keep infill and travel fast.
-
Most “messy at speed” problems are really one of three issues: wet filament, melt control, or vibration.
Cleaner 3D prints without slowing down: the triangle
Clean-looking FFF/FDM prints at speed depend on three systems working together:
-
Material condition (especially moisture)
-
Melt control (temperature, flow, pressure in the nozzle)
-
Motion control (vibration management during fast direction changes)
You can chase retraction settings all day, but if the filament is damp or the motion system is ringing, you’ll keep seeing the same defects.
Step 1: Fix the “free wins” first (they don’t slow prints once dialled in)
1) Dry and store filament like you’re in the UK (because you are)
If you’re seeing fine “hair” stringing, pitted surfaces, or occasional popping at the nozzle, treat moisture as a suspect.
Siraya Tech’s overview of wet filament symptoms links moisture to issues like popping, bubbles/voids, rougher surfaces and stringing (caused by water flashing to steam during extrusion) in their guide to wet filament symptoms, causes, and solutions.
Why this doesn’t slow you down: drying is an off-printer step. Once the spool is dry and stored properly, you often get cleaner walls at the same speeds.
Practical makerspace approach:
-
Keep “daily use” spools in sealed storage with desiccant.
-
If a spool has been out for weeks (or you hear popping), dry it before you do any serious tuning.
If you want a low-friction way to standardise this across a group, set a simple rule: any PETG/TPU/nylon that’s been out overnight goes back into sealed storage; anything that prints stringy gets dried before we touch slicer settings.
Where it’s helpful to have a dedicated workflow, a filament dryer (for example, browsing Sovol’s Filament Dryer collection) can make the “dry → print → store” habit easier to maintain — but it’s not mandatory if you already have reliable dry storage.
2) Use pressure advance / linear advance to clean up corners and seams
A lot of “mess” at speed shows up in the same places:
-
corners (rounded or blobby)
-
seam starts/stops (zits)
-
little bulges after a sharp change in direction
That’s often nozzle pressure lag: the toolhead changes speed, but pressure in the melt chamber doesn’t instantly match.
Klipper describes Pressure Advance as a way to compensate for that nozzle pressure during acceleration and deceleration to reduce ooze and corner blobbing, in Klipper’s Pressure Advance documentation.
Why this doesn’t slow you down: it’s a control strategy. You’re not printing slower — you’re extruding more accurately during speed changes.
Failure mode if you skip it: you end up lowering speeds to hide corner defects that are fundamentally pressure-control issues.
3) Use input shaping to reduce ringing/ghosting at higher acceleration
If your walls show repeated ripples near sharp features (ghosting/ringing), that’s usually vibration: belts, frame, bed mass, and toolhead inertia all have resonant frequencies.
Klipper explains that input shaping (resonance compensation) can reduce ringing/ghosting by suppressing resonances in Klipper’s Resonance Compensation guide. Marlin’s feature docs describe input shaping as adding an anti-vibration signal matched to the printer’s natural frequency in Marlin’s Input Shaping documentation.
Why this doesn’t slow you down: it’s designed to preserve surface finish when you run higher acceleration.
Failure mode if you skip it: you start “solving” ringing by lowering speed everywhere, when the real issue is vibration during direction changes.
4) Sanity-check flow before you micro-tune retraction
Over-extrusion and inconsistent flow make everything look messier:
-
seams bulge more
-
corners blob more
-
small features look fuzzy
Before you hunt for magic retraction numbers, make sure your baseline extrusion is sensible (extruder calibration + flow/extrusion multiplier).
Why this doesn’t slow you down: you’re not adding print time — you’re avoiding wasted prints and avoiding compensating with slow profiles.
Step 2: When you do slow down, slow only the parts that matter
This is the throughput-friendly mindset shift:
-
Most people look at outer walls and visible surfaces.
-
Most print time is spent on infill, internal features, and travel.
So if you need to trade time for quality, trade it surgically.
Outer walls: keep them slower than infill
You can often keep infill fast while running outer walls at a more conservative speed for a cleaner finish.
Why it works: outer walls are where pressure changes, cooling limitations, and vibration artifacts are most visible.
Overhangs: slow those regions, not the whole model
Overhang quality is usually limited by cooling and support, not raw speed.
Use slicer features that slow down only overhang perimeters or only steep angles, instead of lowering global print speed.
Tiny layers: enforce a minimum layer time (but don’t overdo it)
If you’re printing small features (towers, thin fins), the print can get messy because layers don’t have time to solidify.
A modest minimum layer time can help — but if you crank it too high you’ll drag out the whole job.
Pro Tip: If you’re optimising for makerspace throughput, treat “minimum layer time” like a scalpel, not a hammer. Use the smallest value that stops smearing on small features.
Step 3: Fast triage — print quality at high speed, symptom-by-symptom
If you see stringing at high speed (“hairs”)
Start with:
-
dry filament (especially PETG)
-
drop nozzle temp slightly
-
then tune retraction
If your goal is to reduce stringing at high speed without tanking throughput, keep travel fast and tune temperature/retraction first — those are usually the quickest wins.
Simplify3D’s troubleshooting guide highlights retraction and temperature as core levers in their stringing/oozing guide.
If you see blobs and zits 3D printing (especially near the seam)
Start with:
-
flow/extrusion multiplier sanity check
-
seam placement (hide it on a back edge if possible)
-
pressure advance / linear advance tuning
If you see ringing and ghosting in 3D prints
Start with:
-
mechanical checks (belt tension, loose pulleys)
-
input shaping
-
reduce acceleration before reducing overall speed
If surfaces look rough or pitted
Start with:
-
moisture (dry the spool)
-
temperature sanity check
-
confirm nozzle condition and general maintenance
For a baseline maintenance rhythm you can roll into a shared space, Sovol’s ultimate checklist for 3D printer maintenance is a useful internal reference.
A makerspace baseline profile checklist (so you’re not reinventing tuning every week)
If you’re responsible for multiple printers or lots of users, your goal isn’t “the perfect profile” — it’s a stable baseline that prints cleanly for most jobs.
Use this order of operations:
-
Filament discipline: sealed storage; dry when needed.
-
Mechanics: tighten what loosens; replace what wears.
-
Extrusion baseline: sensible flow/temperature for your most-used material.
-
Pressure advance / linear advance: corners and seams.
-
Input shaping: ringing/ghosting.
-
Targeted slowdowns: outer walls, overhangs, tiny layers.
If you need a “default material” that behaves well for many community prints, it also helps to standardise a couple of common materials (PLA + PETG). For PETG-specific quirks (including moisture and stringing tendencies), Sovol’s internal explainer PETG filament explained is a decent starting point.
Next steps
If you want to improve print cleanliness without sacrificing throughput, do two things this week:
-
Pick one printer and dial in dry filament + pressure advance + input shaping as your baseline.
-
Then copy that approach across the rest of your fleet, changing only what actually differs (extruder type, nozzle, enclosure, bed mass).
That’s how you get “clean enough for most prints” without turning every job into a science project.
Share:
Replace 3D Printer Nozzle: When to Do It (and When Not To)
Why Are My 3D Prints Weak and Breaking Easily?