Key takeaways
-
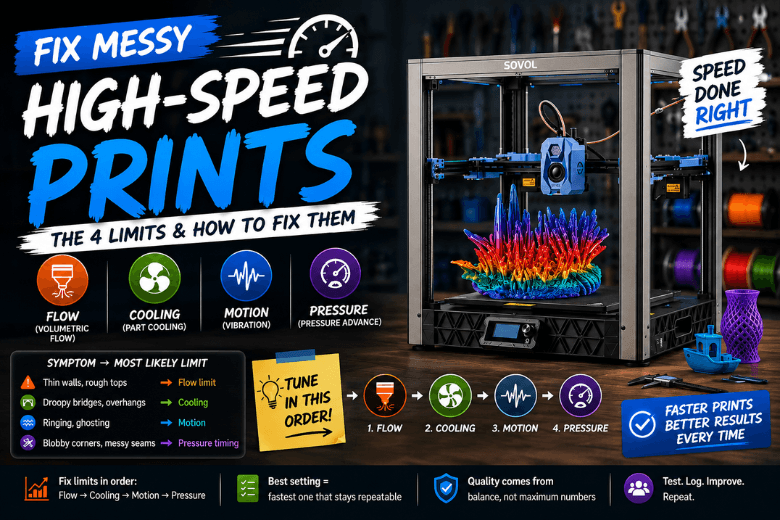
“Messy at speed” is almost always one of four limits: volumetric flow, cooling, motion/vibration, or extrusion pressure timing.
-
Don’t tune randomly. Fix limits in order: flow → cooling → input shaping → pressure advance.
-
In a makerspace or community workshop, the best setting is the fastest one that stays repeatable (not the fastest one that works once).
If you run Sovol 3D printers fast: the 4 limits behind messy results
High-speed printing fails when the profile asks for more than the system can sustain.
Use this map to go from symptom to first fix.
|
What you see on the print |
Most likely limit |
First fix to try |
|---|---|---|
|
Thin walls, gaps, rough top layers, weak infill |
Volumetric flow (hotend can’t melt/push enough plastic) |
Cap max volumetric flow, or drop speed/layer height |
|
Droopy bridges, ugly overhangs, edges curling up and getting hit |
Cooling (plastic stays soft too long) |
More part cooling, slower bridges/overhangs |
|
Repeating ripples after corners (ringing/ghosting) |
Motion/vibration (resonance at high acceleration) |
Tune input shaping; check belts/rigidity |
|
Blobby corners, messy seams, inconsistent line starts/ends |
Pressure timing (nozzle pressure lags motion) |
Tune pressure advance / linear advance |
Fix messy high-speed prints in the order that usually works
1) Volumetric flow: the quiet speed cap
Volumetric flow is how much plastic (mm³/s) your hotend + filament can melt and push reliably. If you exceed it, you’ll chase “mystery” under-extrusion forever.
Ellis’ guide on Determining Maximum Volumetric Flow Rate is a solid, practical way to measure it.
Do this first:
-
If your slicer supports it, set a max volumetric flow limit so it slows down only when needed.
-
If it doesn’t, reduce one variable at a time:
-
layer height (biggest lever)
-
line width
-
speed
-
What it looks like when this is the bottleneck: straight walls look “starved” (thin, patchy), and top surfaces look rough even when motion is stable.
2) Cooling: speed removes the time buffer
When you print faster, each line has less time to solidify. Weak cooling shows up as droopy bridges, sagging overhangs, and curled edges.
Sovol’s article on optimising filament cooling is a useful checklist for ducting, fan direction, and slicer controls.
Do this next:
-
For PLA, push stronger part cooling after the first layers.
-
Slow bridges/overhangs specifically (don’t just drop global speed).
-
If you’re enclosed, be intentional: great for some materials, often counterproductive for PLA cooling.
What it looks like when this is the bottleneck: big flat walls are fine, but geometry-heavy parts turn to mush.
3) Motion/vibration: input shaping is about acceleration, not bravado
If you see ripples after corners, that’s ringing/ghosting. The clean fix is to tune input shaping and keep the mechanics tight.
Klipper’s Resonance Compensation documentation explains the principle and why it unlocks higher acceleration with fewer artefacts.
Do this next:
-
Check the boring stuff: belt tension, loose toolhead parts, wobble.
-
Tune input shaping.
-
If ringing persists, reduce acceleration before you reduce speed.
4) Extrusion pressure timing: pressure advance / linear advance
Once flow, cooling, and motion are in a decent place, the remaining mess is often corners and seams.
Pressure advance (Klipper) is covered in the official Klipper Pressure Advance docs. If you’re on Marlin, the equivalent concept is in Marlin’s Linear Advance documentation.
Do this last:
-
Calibrate pressure advance/linear advance for the filament and temperature you actually use.
-
Only then revisit retraction for stringing.
When tuning isn’t enough: what to change, and what to buy next
For UK maker community leaders, the point of “high speed” is more throughput with less babysitting.
Use these calls to decide whether you’re tuning, upgrading, or replacing.
-
If you keep hitting volumetric flow, your next step is more melt capacity (hotend/nozzle/material choices), not higher motion settings.
-
If you keep hitting cooling, fix airflow and slicer bridge/overhang behaviour before you blame the frame.
-
If you keep hitting motion stability, you want a platform that stays calm at realistic acceleration.
If you’re evaluating Sovol SV08 / SV08 Max specifically, Sovol UK’s guide Essential tips for flawless prints with Sovol SV08 Max calls out input shaping as part of the speed-with-quality toolkit. Treat that as a reminder: the machine can be capable, but your profiles still need to respect the four limits above.
FAQ
Should I tune input shaping or pressure advance first?
If you see ringing, tune input shaping first. If ringing is gone but corners and seams are messy, tune pressure advance next. Sovol’s overview in Input Shaping vs Pressure Advance: When to Use Each Method (2025) explains the split.
Why do calibration prints look fine, but real prints fall apart?
Calibration models often don’t sustain high flow, don’t stress cooling on bridges/overhangs, and don’t repeat sharp direction changes. Real models do all three.
Next steps
Pick one problematic model from your workshop queue and diagnose it using the four-limit table. Make one change, reprint the same model, and log what improved. After two or three iterations, you’ll know whether you’re tuning a profile or shopping for a different capability envelope.
Share:
The rise of home 3D printing: why makers want more space, speed and control
How to Stop 3D Prints from Warping on Large Models