Large models don’t usually warp because you missed one magic setting. They warp because the part is slowly building shrink stress for hours — and one corner eventually wins.
If you’re the person keeping printers running in a UK makerspace or school lab, the goal isn’t “a good first layer once.” The goal is repeatability: the same prep, the same environmental assumptions, and the same slicer defaults that keep big bases flat.
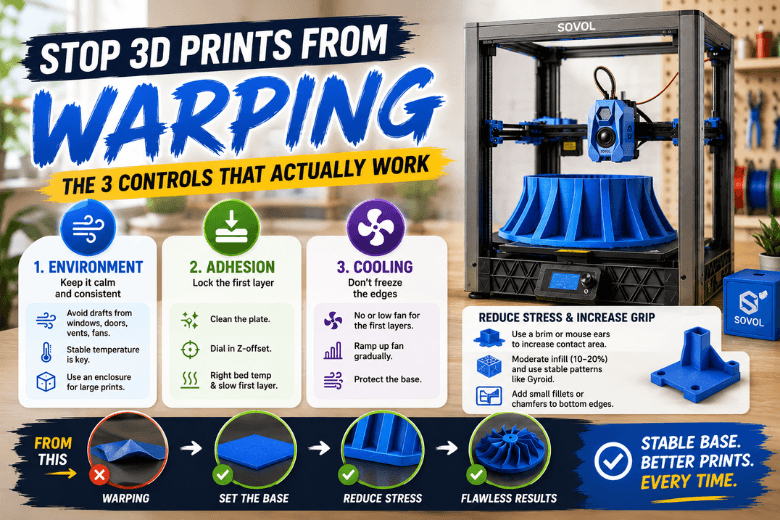
Key Takeaway: Warping is shrink stress vs bed adhesion. On large prints, you prevent it by stabilising the environment, nailing first-layer adhesion, and avoiding aggressive early cooling.
Key takeaways
-
Drafts matter more on large bases than most slicer tweaks.
-
First-layer adhesion is a process (clean surface → Z-offset → bed temp → slow first layer).
-
Delay strong cooling until the base is stable.
-
Increase contact area with a brim or “mouse ears” instead of endlessly raising temperatures.
-
Reduce internal stress with sensible infill and base-friendly geometry.
Stop 3D prints from warping: the 3 controls that actually move the needle
Think in three dials. If you’re losing large prints, one of these is usually out of range:
-
Environment (drafts + ambient stability)
-
Adhesion (first layer, plate cleanliness, Z-offset)
-
Cooling (how fast the edges chill relative to the core)
A useful mental model from Magigoo is that warping comes from “differential thermal contraction”: as each layer cools and shrinks, stress accumulates; if that stress exceeds the part’s stiffness and bed adhesion, corners lift. (Magigoo, “3D printing — Warping and its causes” (2019))
Quick diagnosis
|
What you see |
Most likely culprit |
Do this first |
|---|---|---|
|
Corner lifts after 10–60 minutes |
Drafts or overcooling |
Block airflow; delay cooling fan ramp |
|
Lifts immediately on layer 1 |
Z-offset / dirty plate |
Clean; re-check Z-offset with a one-layer test |
|
One side lifts, other side OK |
Level/mesh or plate seating |
Re-mesh at temperature; check plate is seated flat |
|
“Elephant’s foot” then later lift |
Bed too hot / nozzle too low |
Raise Z-offset slightly or reduce bed temp |
Best practice 1: Stabilise the environment (especially in UK rooms)
Large prints fail in boring ways: a door opens, a window is cracked, a fan kicks on, the room cools in the evening — and the edges start shrinking faster than the middle.
Sovol UK recommends controlling the print environment and notes that an enclosure helps maintain a consistent temperature, especially on large parts. (Sovol UK, “How to Fix Warping in 3D Printing”)
Do this:
-
Put the printer where it won’t get hit by airflow (vents, windows, extractor fans).
-
Let the bed reach temperature and sit a few minutes before starting a long job.
-
If you print ABS/ASA at any scale, treat an enclosure as core kit.
Failure mode: first layer looks fine, then a single “windy” corner starts to curl.
Best practice 2: Make first layer adhesion consistent across the whole bed
Warping loves inconsistency. If one corner is 0.05 mm higher or has a fingerprint worth of oil, that’s the corner that will lift on a 12‑hour print.
Clean the build surface
Standardise a cleaning routine. (In shared spaces, this is the difference between reliable and chaotic.)
For a full, practical first-layer fix order you can use as a house SOP, Sovol UK’s bed-adhesion guide is a good reference. (Sovol UK, “3D printer first layer not sticking: a practical fix order…”)
Set Z-offset after levelling/meshing
If your printers support mesh levelling, do it at printing temperature, then set Z-offset.
Sovol UK’s calibration workflow puts “first layer → extrusion → temperature → motion” in that order, and calls out setting Z-offset at printing temperature. (Sovol UK, “Improve 3D Print Quality… Calibration Guide”)
Match bed temperature to plate + material
A common large-print trap is changing a plate (or plate texture) and keeping the same bed profile.
Bambu Lab’s warping notes call out incorrect heatbed temperature/plate type as a frequent cause, and highlight “No cooling for the first X layers” as a key setting to change when warping appears. (Bambu Lab Wiki, “Printed Model Warping”)
What failure looks like: the base sticks in the centre but lifts at the edges.
Best practice 3: Control cooling (don’t freeze the edges early)
Large parts warp when the edges cool faster than the core. The simplest win is to stop blasting air at the print before the base is locked in.
Do this:
-
Delay fan ramp: 0% (or low) for the first few layers, then increase gradually.
-
If you have a strong auxiliary/side fan, turn it down first.
What failure looks like: corners lift right after fans jump to a high percentage.
Pro Tip: If you need cooling for overhangs, try lowering fan speed but printing those walls slower, rather than cooling the entire part aggressively.
Best practice 4: Use geometry and slicer choices that reduce stress
This is where you can make large bases dramatically more forgiving.
Increase the footprint: brim or “mouse ears”
If you’re seeing 3D print lifting corners, adding contact area is often more effective than chasing temperatures.
Reduce shrink stress inside the part
High infill can make a big print behave like a stiff plate that wants to curl.
Bambu Lab also notes large models and high infill density raise warping risk, and suggests moderating infill and choosing patterns that reduce shrink tendency. (Same warping reference as above.)
Make corners less “pry-bar shaped”
A tiny fillet or chamfer on the bottom edge reduces the stress concentration at the corners.
Material starting points (what to prioritise)
This isn’t a universal settings chart — it’s what to focus on first.
-
PLA: most forgiving. Still sensitive to drafts on very large, flat prints.
-
PETG: good for functional parts; keep first layer consistent and don’t overcool. This is where “first layer adhesion” discipline pays off.
-
ABS/ASA: most warp-prone; prioritise enclosure and stable ambient conditions.
For a concise, practical overview of warping causes and fixes across common materials, Wevolver’s guide is a solid reference. (Wevolver, “3D Print Warping (PLA, PETG, ABS): 6 Simple Fixes” (2025))
A makerspace-friendly 10-minute preflight checklist
-
No drafts: windows/doors/fans won’t blow across the bed.
-
Plate is clean (and you didn’t touch the print area).
-
Bed is fully preheated and has soaked for a few minutes.
-
Mesh/level is current; Z-offset is confirmed.
-
First layer is slow enough to bond.
-
Brim/mouse ears are enabled for large flat bases.
-
Fan ramp is delayed for the first few layers.
-
Infill is sensible (don’t default to “very high”).
-
If printing ABS/ASA, print enclosed.
-
Watch the first 5 minutes — especially the corner that usually fails.
Next steps (Sovol mention, low-pressure)
If you’re documenting a standard operating procedure for your community, it’s worth linking your members to Sovol UK’s own warping checklist and first-layer troubleshooting order so everyone follows the same baseline. You can also cross-reference Sovol UK’s broader post on why large prints fail more often than small ones for a wider “big print” reliability checklist. (Sovol UK)
If you’re building out a dedicated large-print setup (enclosure, ventilation, workflow), Sovol UK’s large-build selection guide has a practical section on home/workshop realities. That kind of 3D printer enclosure planning is often the missing piece for ABS/ASA reliability. (Sovol)
⚠️ Warning: If you add an enclosure for high-temp materials, treat ventilation and safety as part of the project, not an afterthought.
Share:
Why Sovol 3D printers make messy prints at high speed (and how to fix it)
Replace 3D Printer Nozzle: When to Do It (and When Not To)