If you run a makerspace (or you’re the person everyone looks at when the printer starts “spitting spaghetti”), you don’t need another vague overview. You need a working mental model:
-
what the printer is actually doing from spool → nozzle → part
-
where failures are born (so you can fix them fast)
-
which printer capabilities reduce “mentor time” and increase workshop throughput
This is that guide — and at the end, I’ll make a clear recommendation for a printer that fits a UK makerspace-style workflow.
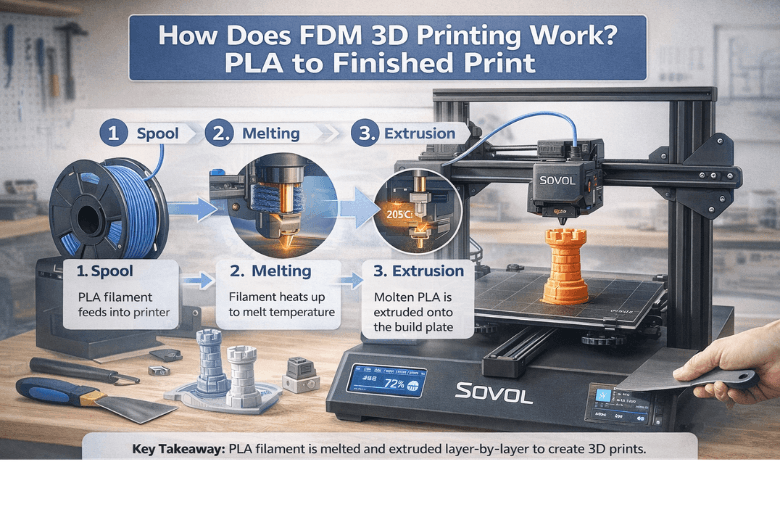
Key Takeaway: Reliable PLA prints come from controlling four things: filament condition (dryness), first-layer setup, steady extrusion, and cooling.
How does FDM 3D printing work step by step?
Most desktop printers in makerspaces are FDM/FFF machines. In plain terms, they melt plastic filament and lay it down in thin lines, building the part one layer at a time.
UltiMaker explains the core mechanism in its overview of FDM vs FFF (2026): molten thermoplastic is extruded through a nozzle and stacked into a 3D form.
Here’s the end-to-end pipeline — with the failure points called out.
1) Model → slicing → toolpaths
A 3D model (STL/3MF) is just geometry. The slicer translates that model into motion and extrusion instructions:
-
layer height (detail vs speed)
-
walls/perimeters and infill
-
print speed, temperatures, cooling
-
supports
In shared spaces, most “printer unreliability” is actually profile inconsistency (different slicers, random defaults, or half-tested tweaks).
2) Filament is pushed by the extruder
The extruder grips filament and pushes it into the hotend. Consistent grip matters because inconsistent feeding becomes inconsistent extrusion — which becomes weak layers and ugly surfaces.
3) The hotend melts PLA, and the nozzle meters flow
PLA is popular in communities because it’s forgiving and low-warp, but it still needs sane ranges.
A practical baseline from Raise3D’s PLA printing guide (2026) is:
-
nozzle temperature often in the ~200–215°C neighborhood (check the spool label)
-
bed temperature often around ~60°C (surface-dependent)
What matters more than the exact number is stability: if you print faster than your hotend can melt consistently, you’ll see under-extrusion and weak layer bonding.
4) Motion draws each layer in X/Y, then steps in Z
The printer repeats a simple loop:
-
draw layer N
-
move up by one layer height
-
draw layer N+1
That’s why motion stability matters. “High speed” only counts if the machine can move fast without ringing, layer shifts, or inconsistent corners.
5) Cooling solidifies the plastic and locks in detail
Each extruded line has to:
-
stick to the bed (first layer)
-
fuse to adjacent lines
-
fuse to the layer below
For PLA, cooling is usually helpful after the first layer (clean overhangs, sharper details). Too much cooling or too low a temperature, though, can reduce layer adhesion.
Pro Tip: If prints look great but snap along layer lines, don’t just increase infill. Recheck temperature, cooling, and whether you’re outrunning your hotend’s melt capacity.
The three failure points that waste the most time
1) Moisture (yes, PLA can be “wet”)
PLA can absorb moisture over time. Wet filament often shows up as stringing, rough surfaces, and inconsistent extrusion.
Bambu Lab’s filament drying guidance gives practical drying temperature ranges (PLA is commonly dried around the mid‑40°C range).
Makerspace rule of thumb: if it’s been left out for weeks, treat it as suspect. Dry it, reseal it, and you’ll save more prints than any slicer tweak.
2) First layer adhesion (especially first layer adhesion PLA)
“First layer adhesion PLA” problems are the #1 source of failed jobs in busy spaces.
Fast triage checklist:
-
clean the bed surface
-
slow down the first layer
-
reduce fan for the first layer
-
verify Z offset/squish (don’t assume)
If you standardise only one thing across your community, standardise the first-layer routine.
3) Speed vs quality (the hidden variable is flow)
When people compare printers, they’ll talk about mm/s. In real life, the limiting factor is often flow (how many cubic millimetres per second the hotend can melt and push).
If you push speed without enough flow, you get:
-
under-extrusion
-
weak layer bonding
-
inconsistent top surfaces
This is where “fast on paper” becomes “unreliable in workshops”.
FFF vs FDM: does it matter?
In practice, not much for the average maker. “FFF” (fused filament fabrication) is the generic term; “FDM” is a trademarked term that became common usage. Most community conversations use them interchangeably.
The key is not the label — it’s whether the machine can deliver consistent extrusion and stable motion for your chosen material.
PLA filament printing tips you can standardise for a community
If you want fewer support tickets (and fewer half-finished prints abandoned on the bed), create a shared baseline:
-
Filament storage: sealed box + desiccant
-
Known-good PLA profile: one slicer profile for mentors to start from
-
Calibration set: first-layer squares, temperature tower, retraction test
-
Change control: one variable at a time; document what changed and why
⚠️ Warning: Don’t let beginners debug three variables at once. Lock down filament brand + profile + bed routine first.
What to look for when you’re choosing a makerspace printer
Decision-stage criteria for UK community leaders usually come down to:
-
Stable motion at real-world speeds (not just peak specs)
-
Automation that reduces mentor involvement (first-layer repeatability)
-
A build volume that matches community projects (fixtures, cosplay, signage)
-
Open-source friendliness (no lock-in culture)
-
UK availability and support (downtime kills workshop throughput)
If you’re comparing fast printers, Sovol UK’s own framing is useful as a starting point: “Up to 700mm/s 3D printers compared”.
Recommendation + next step
If your community is ready to move to a faster CoreXY workflow and you want an open-source-friendly machine positioned around high-speed printing, start by evaluating the Sovol SV08.
A simple, low-drama evaluation plan:
-
run one known PLA spool for a week
-
print the same calibration set daily
-
log failures by type (first layer, stringing, layer adhesion)
-
publish the final baseline profile as your “default community profile”
For more context on large-project throughput and what tends to matter in real builds, Sovol UK’s SV08 Max performance write-up is a helpful adjacent read: SV08 Max review for big projects.
Share:
PLA Filament Explained: Pros, Cons & Best Use Cases
3D Printing Filament Types: How to Choose the Right Material (UK Guide)