If you run a UK makerspace (or you’re the person everyone pings when prints start failing), you’ve probably seen the pattern: a spool that was “fine last month” suddenly strings, pops, and produces brittle parts.
That isn’t just bad luck. A big part of it is that UK homes and shared workshop spaces make it easy for moisture to build up indoors—especially around cooking, showers, and drying laundry—unless it’s actively removed. GOV.UK’s damp and mould guidance explains how moisture from normal occupant activities can accumulate, then condense on cold surfaces when ventilation is inadequate, and how that can lead to damp and mould over time.GOV.UK guidance on damp, mould and condensation (2026)
In other words: your filament is living in the same air.
Key takeaways
-
If your space often feels “a bit damp” (condensation on windows, laundry drying indoors, kitchen steam), assume filament moisture is a recurring failure mode, not a one-off.
-
Moisture shows up as popping/sizzling, bubbles, oozing and weak parts—and it can also chemically degrade some polymers over time.
-
Sealed storage + desiccant is great for keeping filament dry. It’s less reliable for rescuing filament that’s already saturated.
-
If your makerspace prints a lot of PETG/TPU/PA, or spools sit out between sessions, a filament dryer is usually cheaper than the downtime.
The 2-minute decision framework (storage vs dryer)
Use this to decide what to buy (or what to standardise across your community).
|
Your reality in the UK |
What usually works |
What tends to fail |
What to do next |
|---|---|---|---|
|
You mainly print PLA and spools don’t sit out |
Airtight box + desiccant + basic habits |
Leaving spools on open shelves “because it’s only PLA” |
Standardise sealed storage; add a hygrometer in the box |
|
You print PETG/TPU/PA (or anything that strings easily) |
Dry box / active drying workflow |
“I’ll just reseal it after the print” (too late) |
Move to a dryer workflow for sensitive filaments |
|
Spools live in a shared space (students, workshops, open racks) |
One central drying/storage station |
Everyone’s personal storage rules |
Pick one standard process + label it |
|
You see popping, bubbles, or unexplained stringing |
Active drying + then sealed storage |
Tweaking retraction/speed for hours |
Dry first, tune second |
Rule of thumb: if you’re doing repeated troubleshooting on “random” stringing or weak layers, treat wet filament as a likely root cause before you rewrite profiles.
UK humidity and 3D printing: the unglamorous home reality
This isn’t about outdoor forecasts. It’s about what the weather does to the spaces where filament is stored.
When the outdoors is damp and cool, the indoors often ends up in one of two states:
-
Moisture is being produced constantly (showers, cooking, drying clothes).
-
Moisture isn’t being removed fast enough (windows closed for warmth/noise/security; underpowered or poorly used extractors; blocked vents).
GOV.UK highlights that inadequate ventilation makes it harder for moisture to escape a home, and it’s particularly important that moisture-heavy rooms like kitchens and bathrooms have adequate ventilation.
In practical workshop terms: if you can smell last night’s cooking in the morning, your room air is being reused. Filament absorbs that.
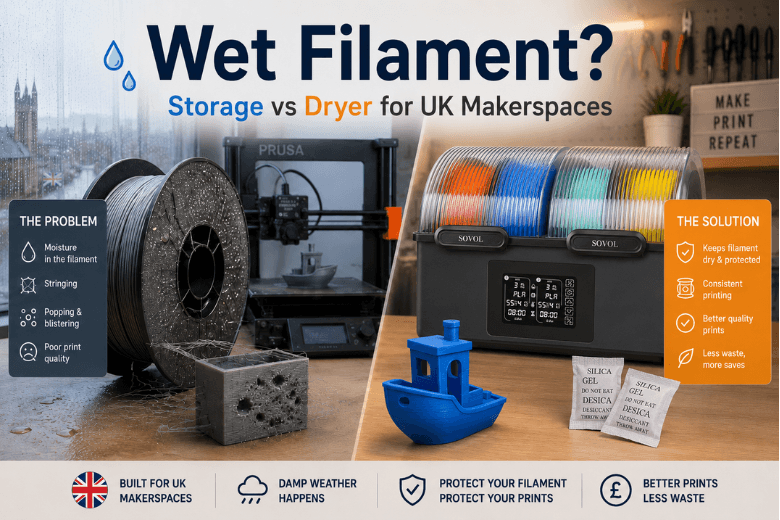
What wet filament looks like (symptoms you can trust)
Some print failures are ambiguous. Wet filament is often not.
BCN3D’s troubleshooting guidance lists common signs of filament affected by humidity, including bubbles, oozing after the extruder motor stops, and sizzling/popping during extrusion.BCN3D on printing issues from humid filament
Quick checks (before you touch slicer settings)
-
Listen: any crackle, hiss, or pop when extruding? That’s a strong signal.
-
Watch a purge line: do you see tiny bubbles/foam in the extruded strand?
-
Inspect the part: pockmarks, rough “blistered” surfaces, and inconsistent extrusion can all point to moisture.
-
Check your timeline: has the spool been left out for weeks between sessions?
Sovol’s FDM explainer also makes the point plainly: PLA can absorb moisture over time, and wet filament often shows up as stringing, rough surfaces and inconsistent extrusion.PLA can be “wet” (Sovol FDM printing explainer)
Pro Tip: For makerspaces, put a cheap hygrometer in the filament cabinet. If people can see the number, they stop arguing about whether moisture is “real.”
What moisture is doing inside the nozzle (foaming vs hydrolysis)
There are two mechanisms to understand, because they explain why “just print hotter” rarely fixes the issue.
Foaming (steam bubbles)
BCN3D describes how moisture evaporates when heated, creating bubbles (foaming) that lead to strings, blobs, poor surface quality and weaker prints.
In practical terms: water expands into steam in the melt zone, which makes extrusion inconsistent.
Hydrolysis (polymer chain damage)
BCN3D also notes hydrolysis: water molecules can break down polymer molecular bonds, leaving filament harder/brittle and potentially increasing clog risk.
That’s the part that surprises people: even if you “push through it” and get an acceptable surface, the material can still be mechanically compromised.
Filament storage that actually works in the UK (three tiers)
Tier 1: Minimal viable storage (good for PLA, short windows)
-
Seal spools in a bag or tub when not in use.
-
Add desiccant.
-
Don’t store near kitchens, bathrooms, or a cold external wall.
This is cheap and useful—but it depends on habits.
Tier 2: Makerspace-safe storage (good for mixed materials)
-
A gasketed box that lives in a stable place.
-
A hygrometer inside the box.
-
A clear rule: spools get put away after every session.
If you’re trying to improve uptime, this tier is often your best ROI.
Tier 3: Drying + storage workflow (when failures cost more than gear)
Passive storage can slow down moisture uptake. It doesn’t reliably reverse a spool that’s already absorbed water.
That’s where an active drying step (a dryer, dehydrator, or a controlled dry cabinet) becomes a practical decision.
How to dry 3D printer filament safely (without wrecking spools)
Drying is a process, not a miracle button.
-
Match temperature to the filament: different polymers tolerate different heat.
-
Dry, then seal immediately: otherwise the spool just starts reabsorbing moisture.
-
Standardise the workflow in shared spaces: if drying is optional, it won’t happen.
⚠️ Warning: If you overheat a spool, you can deform it. Use temperature-appropriate presets and avoid improvising with ovens unless you’re confident and supervised.
When you should buy a filament dryer (criteria + red flags)
If you’re on the fence, decide based on workflow, not vibes.
Criteria that usually justify a dryer
-
You print PETG/TPU/PA/PVA regularly.
-
Spools sit out between sessions (common in workshops).
-
You run long prints where mid-print moisture issues are costly.
-
You want to reduce “mystery tuning” time.
Red flags that mean “dry first, then troubleshoot”
-
Persistent stringing that doesn’t respond to sane retraction settings.
-
Brittle parts or weak layer adhesion without an obvious temperature/part-cooling cause.
-
Audible popping/sizzling.
Example setup: multi-spool drying without drama
A simple process you can teach to new members:
-
Label the “suspect” spools (left out, popping, rough surfaces).
-
Dry first (especially for PETG/TPU/PA and any spool that’s been out for weeks).
-
Store sealed immediately after drying.
-
Only then tune slicer profiles.
If you want a dedicated unit for this workflow, the Sovol SH03 Filament Dryer is an example of the kind of spec profile that’s useful in shared spaces: it supports 1.75 mm / 2.85 mm filament diameters and a 45°C–85°C working temperature range (per the official product page).
If your community is comparing options, Sovol’s filament dryer collection is a quick way to see the range without hunting around.
Next steps (a low-drama BOFU checklist)
-
Add a hygrometer to your storage box/cabinet.
-
Agree a single rule: spools get sealed after every session.
-
When quality drops, dry first, tune second.
-
If you’re ready to standardise, compare dryers on temperature range, spool capacity, noise, and how easy they are for beginners to use.
If you want, I can turn this into a one-page makerspace poster (“wet filament symptoms + what to do”) you can print and stick next to the machines.
Share:
CoreXY vs Bed-Slinger (CoreXY vs Bed Slinger): Which 3D Printer Should You Buy in 2026?
Do You Really Need a Filament Dryer in the UK?