If you’re shortlisting a large-format FFF/FDM 3D printer for a makerspace, “bigger” and “faster” both look like obvious upgrades. In practice, they solve different problems — and they fail in different ways.
Key Takeaway: For large-format printing, the real KPI isn’t peak mm/s — it’s successful print-hours per week. Build volume sets what’s possible; reliability decides whether you’ll actually get it.
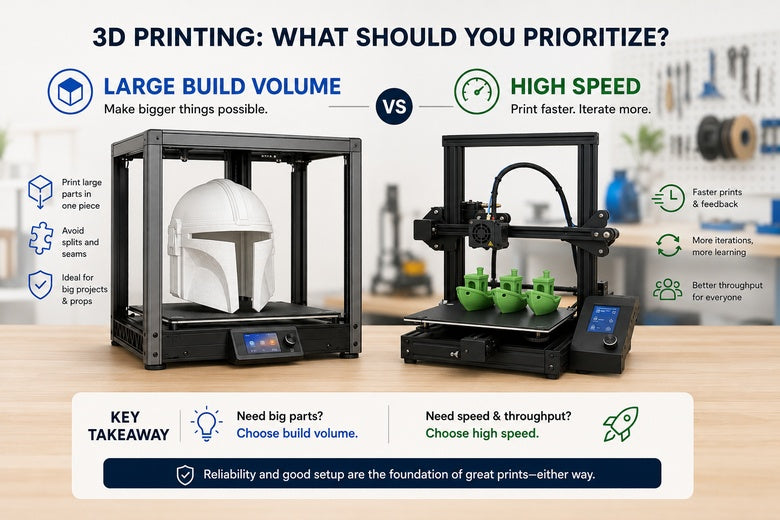
Large build volume vs high speed 3D printer: quick verdict
-
If you routinely need single-piece parts bigger than ~300–350 mm in at least one axis, build volume is the must-have.
-
If most jobs are under ~250–300 mm and you’re trying to increase workshop throughput, speed (or multiple smaller printers) is usually the better investment.
|
Your reality in the workshop |
Prioritise |
Why it usually wins |
What to watch |
|---|---|---|---|
|
Monthly “must-print” parts exceed ~300–350 mm in one axis |
Build volume |
You can’t print what doesn’t fit |
Bed flatness + heating, enclosure/draft control, long-print failure risk |
|
Mostly small-to-medium parts, lots of iteration/teaching |
Speed |
Faster feedback loops beat bigger hardware |
Realistic flow rate, vibration control, noise |
|
Occasional big prints, but daily small parts |
Only buy volume if you truly need it |
Big beds are a penalty on everyday work |
Consider splitting rare big jobs or outsourcing |
|
Shared space where overnight failures are painful |
Reliability over both |
Long prints amplify every weak link |
Spares/support, repeatable levelling, stable profiles |
What “speed” and “size” actually mean
Build volume is straightforward: it defines the largest part you can print in one piece.
Speed is not one number. A printer can advertise a high maximum speed, but real-world print time is usually limited by:
-
volumetric flow (how much plastic the hotend can melt and push)
-
acceleration (how quickly it reaches speed before slowing for corners)
-
cooling and heat control (especially on wide, slow-cooling surfaces)
In other words: the right question isn’t “What’s the max speed?” It’s “What speed can we run at with acceptable quality, on our geometry, in our materials?”
When large build volume is the right “must-have”
Choose build volume first when it unlocks projects you can’t reasonably do any other way.
You’re trying to avoid splitting parts
Splitting big models isn’t just extra CAD time. It also adds seams, alignment issues, and more failure points. If your community prints props, large educational models, or big enclosures, single-piece capability can be the difference between “we can run this workshop” and “we can’t.”
You print big, flat footprints
Large flat parts (panels, trays, base plates) punish small beds. A large bed helps — but it also raises the stakes.
As parts get larger, warping and edge-lift become more likely because thermal gradients and shrink stresses scale up. Practical troubleshooting guidance like the Bambu Lab wiki article on printed model warping repeatedly comes back to the same point: first-layer conditions and temperature stability matter more as parts get bigger.
When high speed is the better investment
Speed wins when your bottleneck is iteration, teaching, and queue time.
You optimise for “time to first acceptable print”
In a makerspace, the hidden cost isn’t filament — it’s mentor time and disrupted sessions. High-speed printers (when tuned and used sensibly) shorten feedback loops, which means faster onboarding and fewer “we’ll try again next week” moments.
You want makerspace 3D printer selection to favour uptime
If you’re choosing printers for a community, you’re really choosing how often they’ll be down. Two mid-size printers can be more reliable than one massive machine because you avoid a single point of failure and you can run different materials and profiles in parallel.
Large-format reality checks (what breaks first)
Large-format is where “size” and “speed” collide with the workshop basics: heat, vibration, time, and noise.
Bed flatness + heating uniformity become first-layer bottlenecks
A larger heated bed is harder to keep uniformly flat and uniformly hot. Mesh probing helps, but it doesn’t magically fix temperature gradients or mechanical distortion across a wide surface.
Warping risk scales with part size and job duration
A 2-hour print can “get lucky.” A 20-hour print is a stress test.
Large-format discussions like OzFDM’s overview of large format printing challenges and solutions make the core risk clear: as parts get bigger, warping forces and the cost of mid-print failure increase.
⚠️ Warning: If your shortlist is “big bed + huge speed number” but you don’t have a plan for drafts, adhesion, and long-print monitoring, you’re not buying capability — you’re buying downtime.
Build volume trade-offs in FDM: long prints punish weak process
This is the unglamorous truth of large builds: you need repeatable habits (bed prep, dry filament, stable environment) more than you need headline specs.
If your team isn’t ready to standardise profiles and maintenance, a smaller, more repeatable fleet often outperforms a single large printer on total output.
A tight shortlist framework (5 minutes, not a spreadsheet)
1) Define your “largest common part,” not your “largest ever part”
Measure the biggest part you print monthly. Treat “once-a-year novelty prints” separately — they’re not a good reason to size your whole printer fleet.
2) Decide what you’re optimising for
Pick one primary KPI:
-
Throughput (more finished parts per week)
-
Capability (printing large single-piece parts)
-
Uptime (fewer failures and less mentoring overhead)
Most community leaders should put uptime at the top. It’s the hidden multiplier on everything else.
3) Use these criteria to shortlist candidates
Keep it simple:
-
build volume that matches your largest common part
-
repeatable first layer (auto-levelling that’s consistent)
-
draft control / enclosure options for big prints
-
serviceability (nozzles, belts, wear parts)
-
spares and support you can actually access in the UK
-
noise under load (not at idle)
A neutral example: how to use specs without falling for them
If your makerspace genuinely needs 500 mm-class volume, it helps to compare candidates through the lens above (first-layer repeatability, draft control, serviceability).
For example, Sovol’s own write-up on running big projects with the SV08 Max is a useful “what to expect” reference in the SV08 Max performance review. If you’re collecting candidates, start from a spec sheet like the Sovol SV08 Max page — then validate those specs against your reality (space, noise, schedule, and support).
FAQ
Is a larger build volume always better?
No. Bigger build volume is only better if it matches what you print regularly. Otherwise you often pay in footprint, bed management overhead, and long-job failure risk.
Does high speed matter for large-format printing?
It can — but for large parts, reliability (first layer + thermal stability) often determines total time-to-success more than peak speed.
What’s the fastest way to pick the right size?
Start with your “largest common part.” If you don’t have one, pull the top 20 files your community prints and measure their bounding boxes.
Next steps
If you want a UK-focused checklist for thinking about space, safety, and setup discipline, Sovol UK’s guide on large build volume 3D printers for UK homes is a solid starting point.
If you’re trying to decide whether you’re really buying speed or just a marketing number, it’s worth learning the difference between max speed, acceleration, and flow rate (that’s where “high speed 3D printing quality trade-offs” show up in the real world).
Share:
How to Improve 3D Print Quality With a Better 3D Printer Setup
How to Choose a 3D Printer for Long-Term Use